

Loading…
Loading…
Loading…
Edexcel GCSE Design and Technology · 1DT0
Edexcel 1DT0 · 2.7.4 Check the specification (PDF) (opens in a new tab)
Assembling brings separate components together to make a working product. Threaded fasteners are useful when a metal prototype may need adjustment, maintenance or replacement parts: the joint can be undone rather than destroyed.
A screw thread is a spiral ridge around a cylinder, with a matching groove inside a nut or threaded hole. Turning the parts moves them along the thread. Once a fastener is tightened against the components, it clamps them together. The external and internal threads must match in size and thread form.
An internal thread can be cut directly into a metal component. Alternatively, a bolt can pass through unthreaded holes and engage with a separate nut. This distinction affects the tools, material thickness and access needed for assembly.
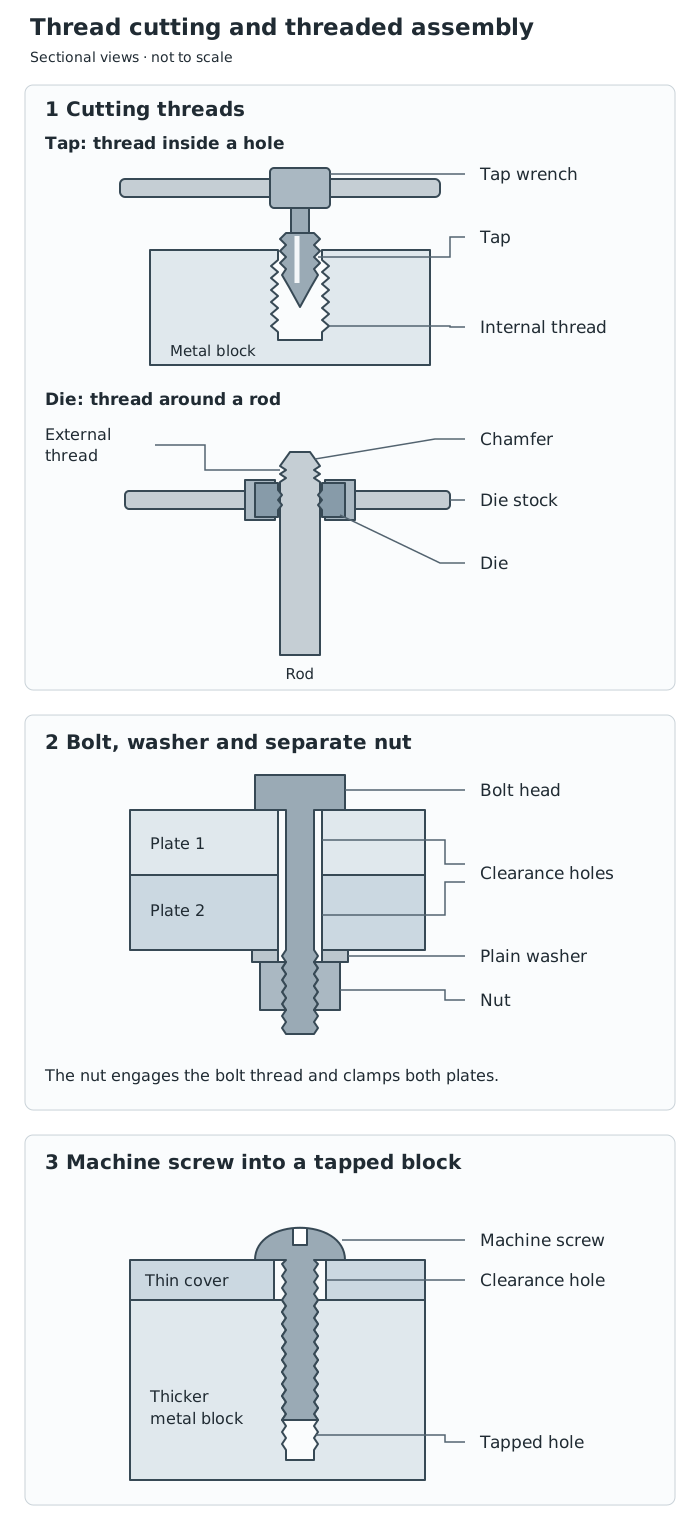
A tap makes an internal thread; a die makes an external thread. Assembly can use either a separate nut or a thread cut directly into a component.
Tapping means cutting an internal thread using a tap held in a tap wrench. It is useful when a machine screw needs to fasten directly into a metal component without a separate nut behind it.
First, drill a hole of the correct tapping size, found in a reference table. This hole must be smaller than the nominal thread diameter: some metal must remain for the tap to cut the thread into. The nominal thread diameter corresponds to the outside diameter of the matching bolt or screw, not the drill diameter.
Secure the work in a vice, wear eye protection and keep the tap square to the hole. Start with a taper tap, whose tapered end helps it enter and begin cutting. Turn forwards to cut, then reverse periodically to break the metal chip. A common guide is one turn forwards and half a turn backwards, but resistance and the material being cut matter more than rigidly counting turns. Do not force a tight tap.
A taper tap may be sufficient in thin material. In thicker material, further taps continue the thread. A bottoming or plug tap can finish the thread near the bottom of a blind hole. Clear chips frequently: chips collect at the bottom, and forcing the tap against them or against the hole bottom can break it. Remove swarf with a suitable brush rather than bare fingers.
The operation is complete when the required length is threaded and the matching screw enters smoothly without excessive looseness. A tapped joint avoids needing access for a separate nut, but the component needs enough material to support a useful length of thread.
A die cuts an external thread on a rod, for example to make a threaded fastening part. A circular split die is held in a die stock, which provides handles for turning it.
Secure the rod and slightly chamfer its end. The chamfer helps the die start and helps it remain square to the rod. Start with the tapered side of the die facing the rod. As with tapping, cut forwards and reverse periodically to break the chip, keeping the tool aligned and avoiding excessive force. Wear eye protection and clear swarf with a brush.
A split die can be opened slightly for the first cut, then adjusted for further cuts until the thread fits the matching nut or threaded hole closely. Completion is judged by the required thread length and a smooth fit without too much slack.
Hand-cutting threads allows custom parts to be made for a prototype, but it takes time and careful alignment. Starting at an angle produces a misaligned thread and a poor joint.
For a nut-and-bolt joint, aligned clearance holes allow the bolt to pass through the components. A nut then screws onto its projecting thread. Hold the bolt head and tighten the nut using suitable spanners or sockets so that the parts are clamped securely.
A plain washer beneath the nut spreads the load over a wider area instead of concentrating it immediately around the hole. A washer can also be placed beneath the bolt head. Larger-diameter repair washers spread the load over an even wider area.
This method gives a removable joint without requiring threads to be cut into the components themselves. For example, two metal brackets can be bolted together and separated later for adjustment. However, the projecting head and nut take up space, and tools generally need access to both sides. The joint is ready when the parts sit correctly together and are held securely without damaging them by overtightening.
Where loosening is a concern, locking features may be appropriate. A Nyloc nut uses a plastic insert to grip the thread. A wing nut can be tightened and undone by hand, making it useful where a component is removed regularly. These choices serve different purposes: easy removal is not the same requirement as resistance to loosening.
Machine screws are generally threaded up to the head, whereas bolts commonly have a plain section of shank below it. A machine screw can engage directly with a tapped hole or with a matching nut.
For example, a removable metal cover can be attached to a thicker tapped component using machine screws. This avoids holding a separate nut behind the component during assembly. Its limitation is the need to prepare accurate matching threads in material thick enough to support them.
Head shape also affects suitability. A countersunk head fits into a cone-shaped recess so that it can finish flush with the surface. A round head gives a smooth raised finish. Select the head and matching tool to suit the available space and whether a projecting fastener would interfere with the product's use.
An adhesive joins components by bonding to their surfaces. Unlike a nut-and-bolt joint, it does not need a fastener passing through the components. This can give a neat appearance without projecting heads or nuts and can join metal to a different material. However, a bonded joint is generally not intended for repeated dismantling, and its success depends strongly on preparation and correct application.
The adhesive must suit both materials and the conditions in which the product will be used. A bond suitable for a decorative covering is not automatically suitable for a heavily loaded joint. Contact adhesive and epoxy resin have different application methods and are useful for different jobs.
Contact adhesive is applied to both surfaces, left until the coatings are ready, then pressed together to produce an immediate bond. Solvent-borne versions lose solvent while the coatings become ready for joining. They are particularly useful for bonding broad surfaces, such as a plastic laminate covering onto a metal panel.
Prepare the surfaces so that they are clean, dry and free from dust, dirt and grease. Apply a thin, even coating to both surfaces and wait for the condition specified by the manufacturer. For example, Bostik Contact Adhesive requires the coating to become just tacky, approximately four minutes at normal room temperature. Other products can require a different waiting time.
Align the parts accurately before bringing them into contact, then press them firmly together. They stick immediately, so there is little opportunity to slide them into a better position afterwards. Readiness is judged by the specified tacky coating before assembly and an immediate bond when the parts are pressed together; follow any further instructions before putting the joint into service.
The advantages are quick assembly, no visible mechanical fastener and suitability for broad mixed-material surfaces. The disadvantages are difficult repositioning and the need for close contact over the bonding area. Material compatibility also matters: Bostik Contact Adhesive is suitable for metals, laminates and some hard plastics, but not polythene, polypropylene, polystyrene or plasticised PVC. It is water resistant, but that does not mean it resists every solvent or is suitable for every wet or hot application.
Work in a well-ventilated area, avoid breathing fumes and prevent skin and eye contact. Use the protective equipment specified by the safety data sheet and follow the teacher's handling and disposal instructions. Solvent-containing adhesive or cleaning solvent may damage a surface, so test compatibility on a small area first.
Epoxy resin adhesive has two components: resin and hardener. Mixing them starts a chemical reaction that turns the mixture into a hard plastic. This hardening process is called curing; it is different from simply waiting for a solvent to evaporate.
Epoxy can join metal to metal and metal to other compatible materials, including wood or glass. Its gap-filling ability makes it useful for small repairs where the surfaces do not fit perfectly. For example, a suitable epoxy could bond a small metal fitting onto a wooden component without a projecting bolt.
Clean and dry the surfaces, removing grease, rust, dust and loose material. Lightly abrade smooth metal surfaces to key them, then remove the debris and degrease as directed. This helps the adhesive bond to the component rather than to contamination on its surface.
Measure resin and hardener in the manufacturer's specified proportions and mix thoroughly until uniform. For Bostik Super Epoxy, equal quantities are required. Mix only what can be applied within the working time: its directions advise using the mixture within approximately three to four minutes. Apply thinly to both prepared surfaces, bring the parts together and support them so they cannot move during setting.
For this product, hold the parts together for approximately 15 minutes. Light handling is possible after about 15 minutes, but full strength takes 24 hours; cold conditions can slow setting. A joint that has stopped moving is not necessarily fully cured. Completion requires the adhesive to have hardened and the specified full-curing time to have passed before the joint carries its intended load.
Epoxy offers a strong, permanent, gap-filling bond and can join different materials. Its disadvantages include cost, the need for accurate mixing, limited working time and the delay before full strength develops. A hard epoxy is unsuitable where the joint needs to flex. Product ratings must also be checked: Bostik Super Epoxy is waterproof but is not suitable for structural applications or temperatures above 80°C. Industrial structural epoxies exist, but an ordinary repair epoxy must not be assumed to have the same capability.
Wear suitable protective gloves and eye protection, avoid skin contact, and follow the adhesive and any cleaning solvent's safety instructions. Use a mixing tool rather than fingers. Work with ventilation where solvents are used, and report any skin or eye exposure immediately so the specified first-aid procedure can be followed.
Start with what the joint must do. A removable cover favours machine screws because maintenance requires dismantling. Two brackets joined through clearance holes may favour nuts, bolts and washers because no internal thread needs to be cut into either bracket. A broad laminate facing on metal favours contact adhesive, while a small permanent mixed-material repair with an imperfect fit may favour a suitable epoxy.
Balance each advantage against a limitation. Threaded fasteners are removable but need holes, space and tool access. Adhesives avoid projecting fasteners but depend on clean surfaces, compatibility and correct setting or curing. The best choice is the one whose properties match the product's loading, materials, finish and maintenance needs.
Distinguish the tools clearly: a tap cuts an internal thread; a die cuts an external thread.
A tapping hole is smaller than the nominal thread diameter. Use a tapping-size table rather than assuming the bolt diameter is the drilling diameter.
Explain what the washer does: a plain washer spreads the clamping load; it does not automatically prevent loosening.
When selecting a joining method, link its advantages and disadvantages to the product: consider dismantling, access for tools, material thickness and the required finish.
Do not describe every bolt as partly threaded. Bolts generally have a plain section below the head, but designs vary.
Distinguish contact adhesive from epoxy resin: contact adhesive bonds when the prepared coatings are pressed together; epoxy cures through a chemical reaction after resin and hardener are mixed.
Initial setting is not the same as full cure. Follow the particular adhesive's instructions rather than giving one setting time for every product.
Do not assume that every epoxy is suitable for structural loads. Adhesive suitability depends on the particular product, materials and service conditions.
It can see this note and what your specification asks for.
Answers are free with an account.
1 free note left this week
Get more free notesYour answer sets when this note comes back for review, or marks it complete.
Was this note helpful?
Log in to tell us whether it helped, or to report a problem.
Last updated
Screw thread
A spiral ridge around a cylinder, or a matching spiral groove inside a hole, that allows parts to engage as they are turned.
Tapping
Cutting an internal screw thread in a drilled hole using a tap.
Die
A cutting tool used to produce an external screw thread on a bar or rod.
Tapping size
The drill diameter needed before cutting an internal thread; it is smaller than the nominal thread diameter.
Bolt
A threaded fastener commonly passed through components and tightened with a nut to clamp them together.
Nut
An internally threaded fastener that screws onto a matching external thread.
Plain washer
A flat ring placed beneath a nut or fastener head to spread the clamping load over a larger area.
Machine screw
A fastener generally threaded up to its head, which engages with a matching internal thread in a component or nut.
Blind hole
A hole that stops within a component rather than passing right through it.
Contact adhesive
An adhesive applied to both joining surfaces and left until ready for bonding before the surfaces are pressed together, producing an immediate bond.
Epoxy resin
A two-part adhesive in which resin and hardener are mixed and react chemically to form a hard, durable bond.
Curing
The chemical process through which an adhesive hardens and develops its final properties.
Keying
Lightly roughening a surface to help an adhesive bond to it.
Put your knowledge into practice — try past paper questions for Design and Technology
Screw thread
A spiral ridge around a cylinder, or a matching spiral groove inside a hole, that allows parts to engage as they are turned.
Tapping
Cutting an internal screw thread in a drilled hole using a tap.
Die
A cutting tool used to produce an external screw thread on a bar or rod.
Tapping size
The drill diameter needed before cutting an internal thread; it is smaller than the nominal thread diameter.
Bolt
A threaded fastener commonly passed through components and tightened with a nut to clamp them together.
Nut
An internally threaded fastener that screws onto a matching external thread.
Plain washer
A flat ring placed beneath a nut or fastener head to spread the clamping load over a larger area.
Machine screw
A fastener generally threaded up to its head, which engages with a matching internal thread in a component or nut.
Blind hole
A hole that stops within a component rather than passing right through it.
Contact adhesive
An adhesive applied to both joining surfaces and left until ready for bonding before the surfaces are pressed together, producing an immediate bond.
Epoxy resin
A two-part adhesive in which resin and hardener are mixed and react chemically to form a hard, durable bond.
Curing
The chemical process through which an adhesive hardens and develops its final properties.
Keying
Lightly roughening a surface to help an adhesive bond to it.