

Loading…
Loading…
Loading…
Eduqas GCSE Design and Technology · C600
Eduqas C600 · Prototyping Techniques and Assembly Check the specification (PDF) (opens in a new tab)
Fabric is flexible: it can stretch, move and distort while being handled. A carefully prepared pattern provides a stable reference for cutting the right shape and placing features accurately. Errors at this stage can leave pockets uneven, matching pieces different sizes or a garment hanging incorrectly.
A pattern is a full-size shape for a fabric component, with instructions for cutting and assembly. Paper is convenient for an initial pattern because it is easy to alter. A reusable card template is more suitable when the same shape must be marked repeatedly. A stencil works differently: its openings allow a decorative design to be applied to the fabric rather than defining the outline of a component.
Choose measuring and marking equipment to suit the job. A flexible tape measure follows curved surfaces; a ruler helps produce straight lines and check distances. Use paper scissors for paper patterns and sharp fabric shears for fabric. Pins or pattern weights keep the pattern in position without allowing the fabric to stretch. For assembly, needles and pins help position and join the prepared pieces; the choice of stitches and machine accessories depends on the fabric and construction process.
For a card stencil, use card, a pencil and ruler to draw the design, and a craft knife on a cutting mat to cut its openings. Draw an outer frame to hold the stencil together. Leave narrow connecting strips, called bridges, between sections so that enclosed parts of the design remain attached rather than falling out.
Keep your supporting hand outside the cutting path and always cut away from it. Cut each opening carefully, leaving the frame and bridges intact. Masking tape can stabilise a damaged section before it is recut. The stencil is ready when its openings are clean, its supporting sections remain intact and it lies flat against the fabric.
To test the stencil, protect the surface beneath the fabric with newspaper. Apply fabric paint through the openings with an up-and-down tapping motion using a sponge, rather than swiping sideways, which can push paint beneath the edges. Leave the printed fabric flat until completely dry; allow at least 24 hours for this process and follow the paint manufacturer's instructions. Clean, clearly defined shapes show that the stencil has controlled the paint successfully.
Pattern language is the shared system of symbols, lines and instructions used to position, cut and assemble textile pieces. Read the pattern key before starting: the appearance of markings can vary between patterns.
The cutting line defines the outer shape. The stitching line lies inside it where a seam will be sewn. The fabric between these lines is the seam allowance. A common allowance is 15 mm, or 1.5 cm, but follow the particular pattern rather than adding this automatically. An allowance is not the same as a tolerance: a tolerance states how much a measurement is allowed to vary.
Other markings have specific jobs:
Before removing a pattern, make sure the marks needed for assembly have been transferred. A correctly cut outline alone does not tell you where every feature belongs.
In woven fabric, the straight grain runs lengthwise, parallel to the selvedge, the finished edge. Unless instructed otherwise, position the pattern's grain-line arrow parallel to this edge. Check the distance from each end of the arrow to the selvedge: equal distances show that the arrow is parallel. Accurate alignment helps the finished product hang correctly rather than twist.
The crosswise grain runs across the fabric, at right angles to the selvedges. Cutting on the cross means orientating a piece across the fabric rather than lengthwise. Follow the pattern's instructions because changing orientation changes how the fabric behaves in the product.
A lengthwise fold runs parallel to the selvedges, commonly bringing them together. A crosswise fold runs across the fabric, commonly bringing the cut ends together. A simple crosswise fold is suitable only where there is no nap or one-way design: otherwise the two layers can place the design or nap in opposite directions. For a directional fabric requiring this arrangement, the layers can instead be separated at the fold and one turned around so both run in the same direction.
Choose the fold specified by the layout and check that the layers lie flat without being stretched. Pin the selvedges to prevent shifting. A piece marked to be placed on a fold must meet that fold exactly. For thick pile fabrics, cutting a single layer with the right side upwards can help avoid layers shifting.
Bias cutting positions pieces diagonally across the grain. Woven fabric has more give in this direction, so a bias-cut garment can drape and fit the body more closely. The trade-off is that diagonal pieces can be harder to arrange economically, increasing waste.
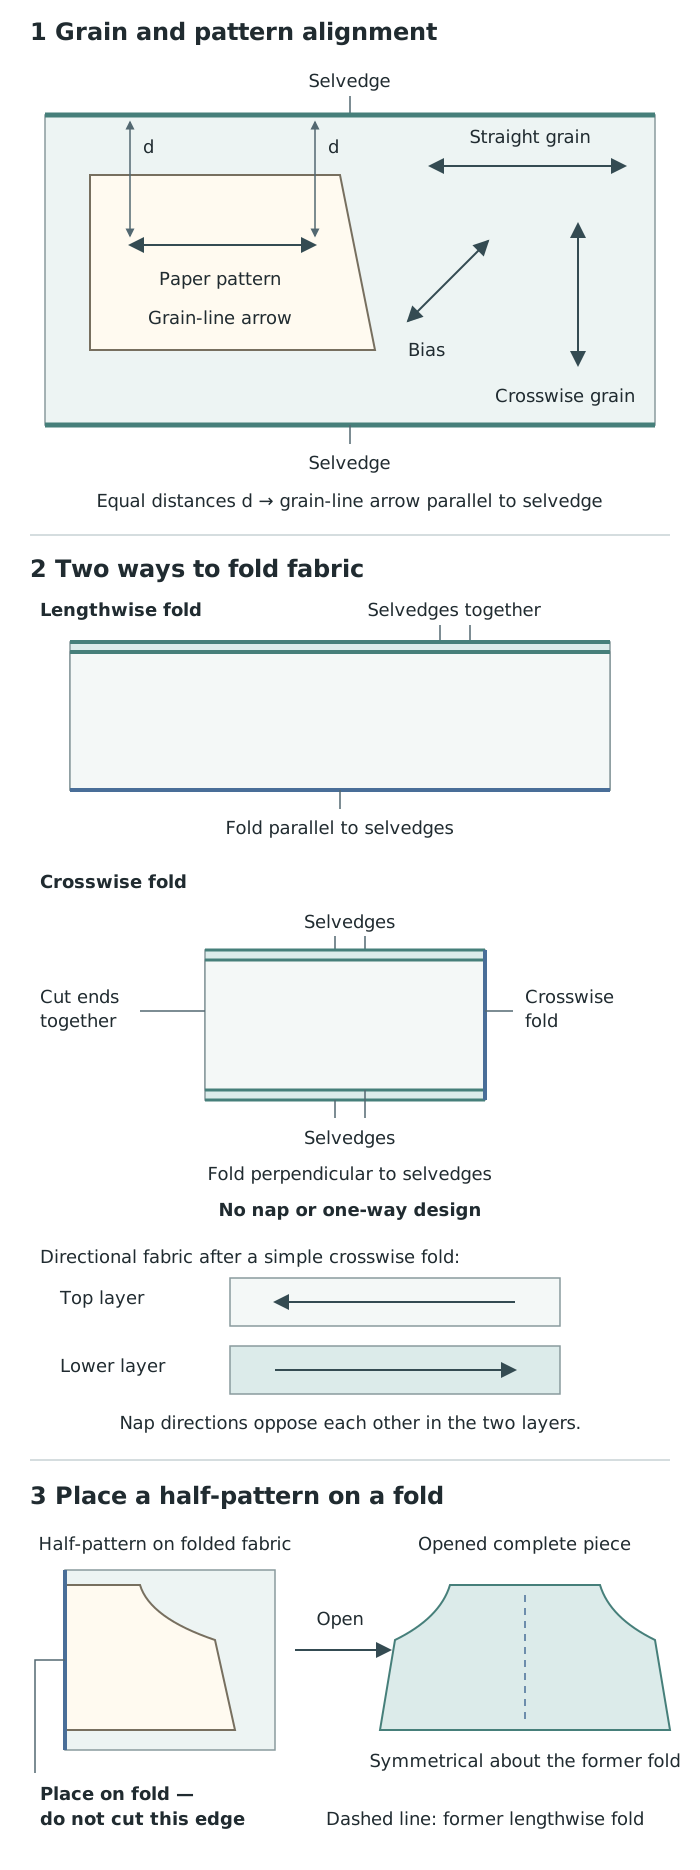
Grain direction controls orientation; folds control how layers and complete pieces are produced. Check both before cutting.
A lay plan shows how all the required pieces fit onto the available fabric. An industrial cutting layout is also called a marker. Its purpose is not simply to fill every gap: it must preserve grain direction, folds, seam allowances and the correct number of pieces.
Start by checking the fabric width, pattern size, required pieces and their cutting instructions. Identify the selvedges, the right side, any one-way design and any nap. Choose the required fold or single-layer arrangement, then position the larger pieces first, beginning with those placed on a fold. Align the grain lines and fit smaller pieces into suitable spaces between larger ones without overlapping cutting lines.
On a plain fabric without a directional surface, pieces may face opposite ways while still respecting their grain lines. On a one-way print, they must face the required direction. On pile fabrics such as velvet, keep the nap running the same way: reversing one piece can make it appear a different shade. These restrictions may use more fabric, but prevent a visibly mismatched product.
For stripes, checks or a large repeating design, check where the design will meet at the stitching lines, not just the cut edges. Corresponding notches help locate matching points. For example, a stripe on one side of a seam should continue into the corresponding stripe on the other side when the seam is sewn. Check the vertical placement, or drop, of repeated motifs as well as their direction. Pattern matching may require extra fabric, so fabric saving cannot take priority over the intended appearance.
Once the complete arrangement is correct, its occupied length provides a basis for estimating how much fabric is needed at that width. Secure the pieces before cutting. The layout is ready when every required piece is present, correctly orientated and clear of neighbouring cutting lines.
Tailor's chalk makes temporary lines and points on fabric. Test it on a scrap first to check that it is visible and can be removed without damage. Mark the necessary dart lines, fold lines and component positions while the pattern is still accurately located. For an internal point, a pin pushed through the pattern can locate the position for a small chalk mark; check each fabric layer.
Tailor's tacks are loose thread marks used to transfer critical placement points by hand. They are useful when a chalk mark would be difficult to see or when a point must be recorded through fabric layers. Separate the layers carefully so that the marks remain in the intended positions.
In industry, hot notch marking can transfer critical points such as pocket positions. The marker bores and seals a tiny hole through the fabric. Unlike temporary chalk, this changes the material, so the location and fabric suitability matter. Heated equipment requires trained operation and protection from contact with its hot parts.
For hand cutting, support the fabric on a flat surface and follow the cutting line with fabric shears, avoiding lifting or dragging the layers. Do not let excess fabric hang over the table edge, where its weight could stretch it out of shape. Keep pins inside the cutting line and transfer notches with shallow snips that remain within the seam allowance. Keep fingers away from blades, store scissors safely and collect loose pins. Cutting is complete when all required pieces have clean outlines, the correct number of layers and the reference marks needed for assembly.
Industrial equipment is selected for the shape, fabric, number of layers and repetition required:
Fabric-spreading machines prepare the material by laying several plies, or layers, on long cutting tables. This allows multiple copies to be cut together. Accurate spreading matters because a displaced or distorted lower layer will not produce the same component as the top layer.
With CAD, a designer prepares or modifies digital patterns and arranges them into a lay plan. Pieces can be moved to improve material use while retaining grain directions and other restrictions. The layout must still be checked: a computer cannot make an incorrectly specified pattern suitable for the fabric.
With CAM, the cutting data controls manufacturing equipment, such as a computer-controlled cutter or laser cutter. This supports accurate, repeated cutting of templates and fabric pieces, including continuous production runs. CAD is the design and planning stage; CAM is the physical manufacturing stage.
Before a full run, check a trial cut against the intended dimensions and markings. The useful outcome is not merely a fast cut, but a complete set of correctly sized pieces that can be assembled without avoidable distortion or misalignment.
Explain a tool choice by linking its function to the task: for example, a reusable card template maintains the same outline when cutting repeated pieces.
Distinguish a grain line from a cutting line: the grain line controls orientation; the cutting line controls the shape cut out.
Do not rotate pieces simply to save fabric if this breaks the grain-line, one-way print or nap requirements.
Distinguish seam allowance from tolerance: allowance is the fabric provided for joining; tolerance is the permitted variation from a specified measurement.
When explaining CAD/CAM, identify both stages: CAD prepares the digital pattern or lay plan; CAM controls its manufacture.
It can see this note and what your specification asks for.
Answers are free with an account.
1 free note left this week
Get more free notesYour answer sets when this note comes back for review, or marks it complete.
Was this note helpful?
Log in to tell us whether it helped, or to report a problem.
Last updated
Pattern
A full-size shape used to mark or cut a fabric component, carrying instructions needed for positioning and assembly.
Template
A reusable shape used to reproduce an outline or position accurately.
Stencil
A sheet containing cut-out openings through which a design can be applied to a surface.
Pattern language
The symbols, lines and instructions on textile patterns that communicate how pieces should be positioned, cut and assembled.
Lay plan
An arrangement of pattern pieces on a specified fabric width, designed to use material economically while following cutting instructions.
Selvedge
The finished lengthwise edge of woven fabric, used as a reference when aligning the straight grain.
Grain line
A pattern marking indicating the direction in which a piece must be positioned relative to the fabric grain.
Bias
A diagonal direction across woven fabric. Cutting on the bias allows more stretch and can improve drape.
Nap
The directional surface of a pile fabric, such as velvet, which can appear a different shade when viewed in opposite directions.
Balance mark
A reference mark used to match corresponding points on fabric pieces during assembly.
Seam allowance
The extra fabric between the stitching line and the cut edge that allows pieces to be joined.
Tolerance
The permitted variation from a specified dimension.
Ply
One layer of fabric in a stack prepared for cutting.
CAD
Computer-aided design: using computer software to prepare or modify designs, patterns and lay plans.
CAM
Computer-aided manufacture: using computer-controlled equipment to carry out manufacturing operations.
Put your knowledge into practice — try past paper questions for Design and Technology
Pattern
A full-size shape used to mark or cut a fabric component, carrying instructions needed for positioning and assembly.
Template
A reusable shape used to reproduce an outline or position accurately.
Stencil
A sheet containing cut-out openings through which a design can be applied to a surface.
Pattern language
The symbols, lines and instructions on textile patterns that communicate how pieces should be positioned, cut and assembled.
Lay plan
An arrangement of pattern pieces on a specified fabric width, designed to use material economically while following cutting instructions.
Selvedge
The finished lengthwise edge of woven fabric, used as a reference when aligning the straight grain.
Grain line
A pattern marking indicating the direction in which a piece must be positioned relative to the fabric grain.
Bias
A diagonal direction across woven fabric. Cutting on the bias allows more stretch and can improve drape.
Nap
The directional surface of a pile fabric, such as velvet, which can appear a different shade when viewed in opposite directions.
Balance mark
A reference mark used to match corresponding points on fabric pieces during assembly.
Seam allowance
The extra fabric between the stitching line and the cut edge that allows pieces to be joined.
Tolerance
The permitted variation from a specified dimension.
Ply
One layer of fabric in a stack prepared for cutting.
CAD
Computer-aided design: using computer software to prepare or modify designs, patterns and lay plans.
CAM
Computer-aided manufacture: using computer-controlled equipment to carry out manufacturing operations.
Recognise grain lines, place-on-fold marks, notches, balance marks, dart markings, tuck/pleat lines, pocket and fastening positions, centre-front/back lines and seam allowances.
Transfer assembly marks before removing the pattern: tailor's chalk, tailor's tacks or industrial hot notch marking. Dart legs locate stitching; tuck/pleat lines locate folds and alignment.
CAD prepares patterns and lay plans; CAM controls manufacture. Check a trial cut before repeated production.