

Loading…
Loading…
Loading…
Edexcel GCSE Design and Technology · 1DT0
Edexcel 1DT0 · 7.6.1 Check the specification (PDF) (opens in a new tab)
A timber product may need several different processes. A cabinet part could first be sawn to size, then routed to make a groove for a panel. A frame needs joint recesses, while a curved laminated component needs its layers held in shape as the adhesive sets.
The choice depends on the material, the shape required, the accuracy needed and how many matching parts will be made. Cutting processes remove material; a bag press instead shapes and bonds thin layers.
Sawing removes material along a cutting line using a toothed blade. It is useful for cutting solid timber to length and cutting components from manufactured boards.
The blade and machine must suit the shape. A wide-bladed hand saw is suited to straight cuts, while a narrow blade allows curved cutting. A circular saw is useful for straight cuts in sheet timber. A bandsaw can make straight or curved cuts, and a handheld electric jigsaw uses interchangeable blades to cut different materials and shapes.
Hand sawing needs relatively simple equipment and is useful for individual pieces, but it takes effort and its accuracy depends on the operator. Powered saws can cut more quickly and accurately, although they require more equipment and strict safety precautions. A circular saw would be a better choice for a straight board edge than for a curved outline.
Mark out the component and support the work securely before cutting. Keep hands clear of the blade, use guards and dust extraction, and operate machinery only with the required training and supervision. Check the finished cut against the marked dimensions and shape; cutting quickly is not useful if the component is the wrong size.
A router uses a high-speed rotating cutter, called a router bit, to remove timber or manufactured board. Different bits produce different features: a straight bit can cut a groove, while a shaped bit can create a decorative edge profile. Routing can also make rebates, slots and cut-outs.
For example, a groove in a cabinet side can locate the edge of a panel. Routing produces this recessed feature without cutting the whole board into separate pieces.
The workpiece must be held securely. A fence guides a straight cut, while a template or jig guides a particular shape. Several shallow passes can reach the required depth more safely and accurately than one deep cut. After cutting, check the feature's position, depth and dimensions.
Routing is versatile, and a template helps repeated components match. However, it needs the correct cutter and careful setting up. It also creates dust and exposes the operator to a fast-moving cutter. Secure the work, use dust extraction, follow the machine's feed-direction instructions and isolate the power before changing the bit.
A mortise is a recess cut into one timber component. A matching projection, the tenon, fits into it to form a mortise-and-tenon joint. This is useful for joining members of a solid-timber frame, such as a chair rail and leg. The process creates a joint feature rather than simply changing the outside outline.
A sharp chisel tapped with a mallet can remove timber to form a mortise by hand. This uses relatively simple tools, but takes time and skill. A hollow-chisel mortiser makes the recess more quickly by combining two cutting actions: a rotating auger removes most of the waste, while a fixed hollow square chisel surrounding it cuts the corners and straight walls. Several adjacent plunge cuts form an elongated mortise.
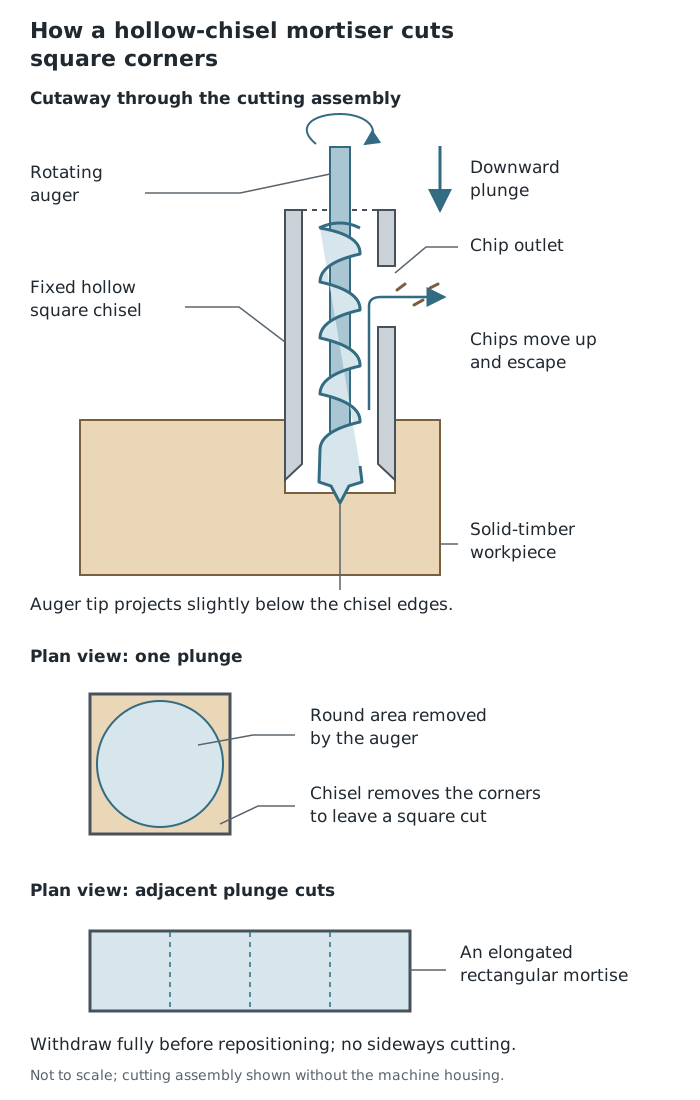
The auger removes waste while the surrounding square chisel cuts the corners. Adjacent plunge cuts produce a longer mortise.
The auger projects slightly below the chisel so that it enters the wood first. Its spiral carries chips upwards, and an opening in the chisel lets them escape. Correct clearance matters: trapped chips cause friction, heat and burning.
Mark out the mortise's position and length, using a mortise gauge set to the chosen chisel width. With the power isolated, a trained person fits the matching sharp auger and chisel, sets their clearance according to the machine instructions and aligns the square chisel with the fence. The fence positions the timber relative to the cutter; the locked depth stop limits how far the cutter can plunge.
Clamp the work securely both horizontally and vertically. Vertical restraint is important because friction can lift the timber as the chisel is withdrawn. A stopped mortise ends within the timber; a through mortise passes completely through it. For a through mortise, sacrificial timber beneath the work helps prevent the underside splitting as the cutter emerges; cutting from both faces is another suitable approach when accurately aligned.
Cut the two ends first to establish the mortise's length. Then remove the waste between them with spaced plunge cuts, leaving small bridges of timber to support the chisel. Finally remove these bridges. Fully withdraw the cutter before repositioning the work: a hollow-chisel mortiser plunges downwards rather than cutting sideways. Use controlled plunges without forcing the cutter, withdrawing regularly to allow chips to clear. Stop and seek the teacher's help if cutting becomes difficult or the timber burns.
After switching off and allowing movement to stop, check that the mortise has the required position, width, length and depth, with clean, straight walls and no remaining waste. Trial-fit the matching tenon: the parts should assemble closely without excessive force or unwanted movement.
A mortiser is useful when a frame needs several accurate, matching joint recesses. It removes waste and squares the corners in the same operation; the fence and depth stop help repeat the position and depth. However, it requires specialist equipment, careful setup and sharp tools. Incorrect alignment produces uneven walls, while poor chip clearance can cause overheating. For an occasional recess, hand chiselling may avoid the need for a dedicated machine, but requires more operator skill and time.
In a school workshop, use a hollow-chisel mortiser only after training and assessment, under a trained person's supervision, with one student operating it at a time. Chain mortisers are not suitable for school use. Wear eye protection, secure hair and loose clothing, remove dangling jewellery and follow the workshop's dust-control precautions. Check the clamps, guards and locked depth stop, remove the chuck key before starting, and know where the emergency stop is. Keep sufficient space around long timber and isolate the power before adjustments or clearing trapped waste.
Thin veneers can bend more readily than a thick piece of timber. Laminating uses adhesive to bond these layers together while they are held in the required shape. This provides a way to make a curved timber component without sawing its entire outline from a thick block.
A bag press uses a sealable flexible bag connected to a vacuum pump. The glued veneer layers are arranged over a former, a solid shape that defines the component's final curve. The layers and former are placed inside the bag, which is sealed before the pump removes air.
Removing air reduces the pressure inside the bag. The higher atmospheric pressure outside pushes the flexible bag against the layers, pressing them together and against the former. The former determines the shape; the bag applies even pressure to hold the layers in that shape while the glue dries.
The layers remain under pressure until the adhesive has set sufficiently to hold the shape. A tightly drawn bag shows that pressure is being applied; it does not prove that the adhesive has finished curing. Follow the adhesive's curing instructions before releasing the pressure and removing the component.
Even pressure across a curved surface is a key advantage compared with applying pressure at separate points using clamps. This makes bag pressing useful for curved furniture components, such as curved cabinet doors. Its limitations include preparing the layers and former, maintaining an airtight seal and waiting for the adhesive to cure. An incomplete seal lets air enter and prevents the required pressure difference from being maintained. Follow the adhesive's handling precautions, provide suitable ventilation and use the press under appropriate supervision.
A bag press can also hold a decorative veneer against a flat manufactured-board panel while the adhesive dries. For example, when veneering MDF, prepare the surface and remove dust, apply a suitable adhesive, align the veneer with the panel, then hold the two together under pressure until the adhesive has set. Here the purpose is bonding a surface covering, rather than creating a curve.
Choose according to the feature, not simply the fastest available machine. Sawing suits separating parts and cutting outlines; routing suits controlled grooves, rebates and profiles; mortising cuts a recess for a frame joint; and a bag press holds laminated layers in a curved shape or presses veneer onto a panel. Repeated routing may justify making a template, whereas repeated mortises benefit from a fence and depth stop. A curved laminated component needs a former and time for its adhesive to set.
Mark out → set matching auger and chisel, fence and depth stop → clamp horizontally and vertically → cut ends, spaced plunges and remaining bridges → check dimensions and tenon fit.
A stopped mortise ends within the timber; a through mortise passes through it. Back through cuts with sacrificial timber to reduce tear-out. Withdraw the cutter before repositioning.
Secure work, keep hands clear and follow machine instructions. Use guards, eye protection, dust controls and trained supervision. Remove the mortiser's chuck key before starting; isolate power before adjustments. Keep a laminate under pressure until the adhesive has set—not merely until the bag looks tight.
Link a process to the feature required: sawing for cutting out parts, routing for grooves or shaped edges, mortising for a joint recess, and a bag press for curved laminated timber.
Explain advantages in context. For example, a router template helps repeated cabinet parts have matching dimensions; simply saying ‘accurate’ does not explain why.
Distinguish a mortise, which is a recess, from a mortiser, which is a machine that cuts it, and a tenon, which is the projecting part that fits into it.
When explaining a hollow-chisel mortiser, distinguish the rotating auger, which removes waste, from the fixed square chisel, which cuts the corners.
A bag press shapes and bonds layers; it does not cut timber. The adhesive must set before the pressure is released.
It can see this note and what your specification asks for.
Answers are free with an account.
1 free note left this week
Get more free notesYour answer sets when this note comes back for review, or marks it complete.
Was this note helpful?
Log in to tell us whether it helped, or to report a problem.
Last updated
Routing
Removing timber with a high-speed rotating cutter to produce features such as grooves, rebates and shaped edges.
Groove
A channel cut into a material, for example to locate a panel in a cabinet.
Rebate
A step-shaped recess cut along the edge of a piece of material.
Template
A guide that controls the path of a tool so that a shape can be reproduced.
Mortise
A recess in timber into which a matching tenon fits to form a joint.
Tenon
A projecting section at the end of a timber component that fits into a mortise.
Hollow-chisel mortiser
A machine that cuts square-sided recesses in timber using a rotating auger inside a fixed hollow square chisel.
Auger
A spiral drill bit that cuts into timber and carries waste chips out of the hole.
Depth stop
An adjustable machine setting that limits how deeply a cutting tool enters the workpiece.
Laminating
Bonding thin layers of material together with adhesive, sometimes while holding them around a shaped former.
Veneer
A thin sheet of wood that can be bonded to other layers or to a supporting material.
Bag press
Equipment that uses reduced air pressure inside a sealed flexible bag so that outside air pressure presses materials together or against a former.
Put your knowledge into practice — try past paper questions for Design and Technology
Routing
Removing timber with a high-speed rotating cutter to produce features such as grooves, rebates and shaped edges.
Groove
A channel cut into a material, for example to locate a panel in a cabinet.
Rebate
A step-shaped recess cut along the edge of a piece of material.
Template
A guide that controls the path of a tool so that a shape can be reproduced.
Mortise
A recess in timber into which a matching tenon fits to form a joint.
Tenon
A projecting section at the end of a timber component that fits into a mortise.
Hollow-chisel mortiser
A machine that cuts square-sided recesses in timber using a rotating auger inside a fixed hollow square chisel.
Auger
A spiral drill bit that cuts into timber and carries waste chips out of the hole.
Depth stop
An adjustable machine setting that limits how deeply a cutting tool enters the workpiece.
Laminating
Bonding thin layers of material together with adhesive, sometimes while holding them around a shaped former.
Veneer
A thin sheet of wood that can be bonded to other layers or to a supporting material.
Bag press
Equipment that uses reduced air pressure inside a sealed flexible bag so that outside air pressure presses materials together or against a former.