

Loading…
Loading…
Loading…
Eduqas GCSE Design and Technology · C600
Eduqas C600 · Prototyping Techniques and Assembly Check the specification (PDF) (opens in a new tab)
A timber prototype begins with stock material: lengths of natural timber or sheets of manufactured board. Making a high-quality product means choosing processes that produce the required dimensions, shape and fit, rather than simply removing material as quickly as possible.
Wastage removes material. Sawing creates offcuts, drilling removes material to make a hole, and sanding removes small particles to smooth a surface. Addition builds up a component by adding material; bonding timber layers together is an example. Bending changes the shape of material rather than cutting the whole shape from a larger piece.
These processes often work together. A curved furniture component might be formed from glued layers, trimmed to size, drilled and then joined to other parts.
Marking out transfers the dimensions and shape of a design onto the timber. Use a steel rule for short measurements and a tape measure for longer lengths. A try square helps mark lines at right angles to an edge and check whether an edge is square.
Choose a straight reference edge and take related measurements from it. This helps holes and cuts line up instead of allowing small measuring errors to accumulate. Mark the waste side of a cutting line so it is clear which material must remain.
Secure the material in a vice or with clamps before cutting or shaping it. The work should not rock or slide, and the tool's path must be clear. Protect visible surfaces from clamp marks and keep hands outside the cutting path. Accurate marking is of little use if the work moves during the operation.
The required cut, material thickness and shape determine the tool choice.
Cut on the waste side of the line, leaving the retained component large enough for final shaping. Check the dimensions before removing more material: timber cannot be put back once it has been cut away.
A plane removes thin shavings from natural timber to straighten or smooth an edge or surface. A chisel, used with controlled hand pressure or a mallet, removes local areas of timber, such as waste between saw cuts in a joint. Clamp the work and keep both hands behind the chisel's cutting edge.
Abrasive paper smooths edges and surfaces and makes small adjustments to shape. Lower grit numbers are coarser and remove material more rapidly; higher numbers give a finer surface. Wrapping abrasive paper around a sanding block helps keep a flat face flat. Stop when the required dimensions and surface quality are reached, rather than sanding until corners become rounded unintentionally.
Use eye protection for workshop operations and suitable dust extraction when machining or sanding. MDF and other boards can produce fine dust. Powered equipment must be used with training, supervision and its guards in place.
A drill makes a hole by rotating a cutting bit into the material. A hand drill is portable; a pillar drill supports the drill vertically and gives controlled movement into securely held work. Different bit diameters produce different hole diameters: a 6 mm hole requires a suitable 6 mm bit.
A typical pillar-drilling sequence is:
Wear eye protection, tie back long hair and secure loose clothing. Keep hands clear of the rotating bit and do not wear gloves near rotating machinery.
The hole is complete when it reaches the specified depth or passes through the work as intended. Check its position, diameter and whether a mating part fits correctly. A drilling jig is useful when several holes must have matching positions.
A jig locates the workpiece or guides the tool. For example, a drilling jig can position matching holes in two timber parts. A cutting jig can locate a component consistently so a cut is made at the required position or angle. The jig must itself be accurate, and the work must sit firmly against its locating surfaces.
A former controls shape. Thin glued timber layers can be clamped around a curved former, or steamed solid timber can be bent against one. The former supports the curve while the material sets or dries. It does not replace checking the finished component against the intended shape.
Jointing connects separate timber components so they work as a product. The maker marks out and cuts matching features, checks their fit and then assembles them. A dry fit—putting the parts together before applying adhesive—allows alignment and fit to be checked while corrections are still possible. Detailed joint types and permanent or removable fixings are separate choices within the assembly process.
Veneering applies a thin layer of wood to another material. It gives the visible surface the colour and grain of the chosen veneer without making the entire component from that timber. For example, plywood can be faced with a high-quality wood veneer to improve its appearance.
The veneer is bonded to a prepared surface and held evenly while the adhesive sets. The desired result is a flat, securely bonded surface without lifted edges or bubbles. Veneering mainly changes the surface appearance; it is not the same as building a structural component from several layers.
Laminating bonds thin layers of timber together under pressure. The layers can build a flat component or be bent around a former to produce a curve. Thin layers bend more readily than one thick piece, and the bonded layers retain the formed shape once the adhesive has cured.
Apply suitable adhesive between the layers, align them and clamp or press them evenly against the former. Follow the adhesive's curing instructions before removing the clamps. Check that the layers remain bonded and the component retains the required curve. Plywood is a familiar laminated board, with adjacent veneer layers arranged at right angles; this does not mean every curved laminate must use that grain arrangement.
Steam bending shapes a piece of solid timber without building it from glued layers. Steam makes the timber more flexible. The timber is then bent around a former and held until it dries sufficiently to retain its shape. It can produce curved furniture parts while keeping the timber continuous around the curve.
Steam and hot timber can cause burns. Use suitable heat protection and supervised equipment, keep clear of escaping steam and handle the softened timber carefully. The part is ready to release only when it has dried and set sufficiently; check its retained curve and look for splitting.
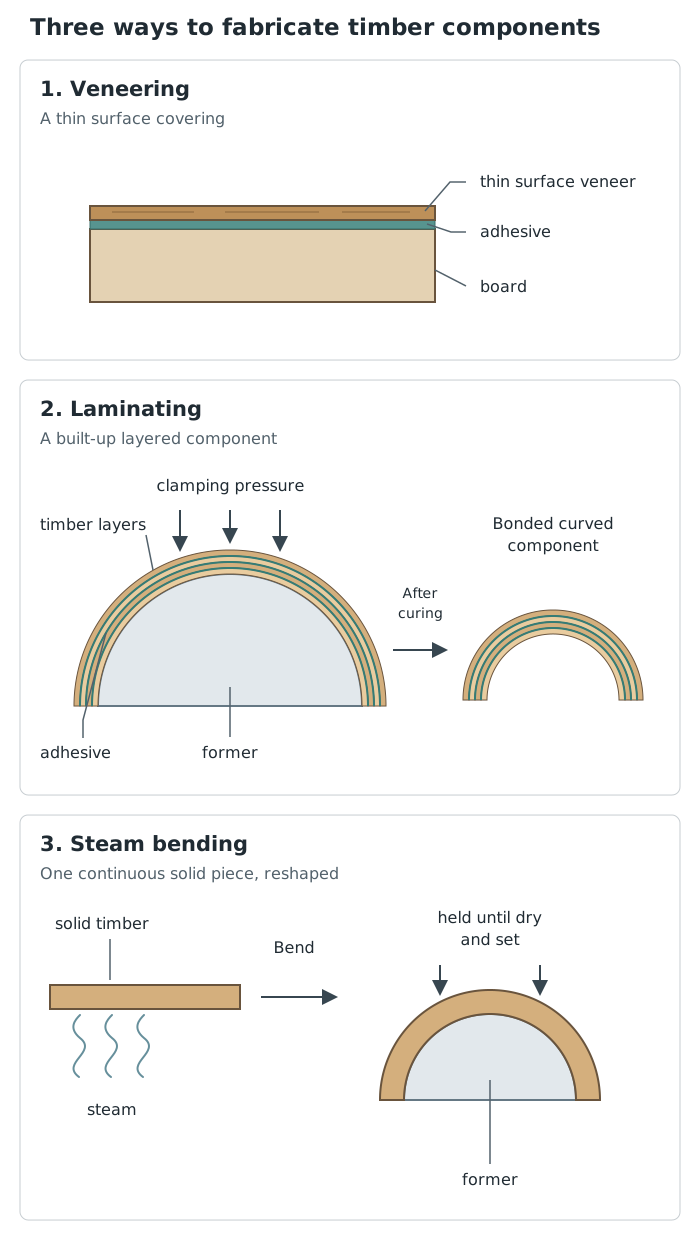
Veneering changes the surface; laminating builds with layers; steam bending reshapes solid timber.
Computer-aided manufacture (CAM) uses computer-controlled machinery to make features from a digital design. It can cut mating parts, engrave surfaces and mark positions for holes or fixings. Accurate digital dimensions and correct machine setup help produce parts that fit together.
A laser cutter uses a focused beam to cut or engrave suitable timber materials. It is useful for detailed profiles in appropriate sheet material. A computer-controlled router instead removes material with a rotating cutting tool and can machine features such as recesses.
CAM is not automatically accurate simply because a computer is involved. Check the drawing, material position and settings. For laser cutting, power and speed must suit the approved material and its thickness: incorrect settings may leave an incomplete cut or excessive burning. A small test on the same material can help check the result before making the final part.
Use laser equipment only with approved materials, working extraction and its enclosure and interlocks in place. Follow supervision and fire-safety procedures. Finally, inspect the prototype's dimensions, surface quality and fit: a completed machine operation is not, by itself, proof of a high-quality component.
Justify a tool choice by linking it to the required result: for example, a coping saw for a curved cut in thin timber, rather than simply saying it is suitable.
Distinguish a jig, which locates work or guides a tool, from a former, which controls the shape of a bent component.
Do not confuse veneering with laminating: veneering adds a thin surface layer; laminating bonds layers together to build a component.
Explain how accuracy is achieved. CAM still needs a correct drawing, suitable settings and securely positioned material.
For a process question, describe the sequence and how the finished part is checked, not just the equipment used.
It can see this note and what your specification asks for.
Answers are free with an account.
1 free note left this week
Get more free notesYour answer sets when this note comes back for review, or marks it complete.
Was this note helpful?
Log in to tell us whether it helped, or to report a problem.
Last updated
Wastage
A manufacturing process that removes material from stock to produce the required shape, such as sawing, drilling or sanding.
Addition
A manufacturing process that builds up a component by adding material.
Marking out
Transferring the required dimensions, shape and feature positions onto material before making it.
Jig
A device that locates a workpiece or guides a tool so an operation is carried out accurately.
Former
A shaped support around or against which material is formed to produce a required shape.
Pillar drill
A machine with a drill mounted on a vertical column, used to drill controlled holes into securely held material.
Veneering
Applying a thin layer of wood to the surface of another material to improve its appearance.
Laminating
Bonding layers of timber together under pressure to build a component, which may be flat or curved.
Steam bending
Using steam to make solid timber flexible enough to bend around a former, then holding it until it dries and retains its shape.
Jointing
Connecting timber components using joints to construct a product.
Computer-aided manufacture (CAM)
Using computer-controlled machinery to manufacture parts from a digital design.
Put your knowledge into practice — try past paper questions for Design and Technology
Wastage
A manufacturing process that removes material from stock to produce the required shape, such as sawing, drilling or sanding.
Addition
A manufacturing process that builds up a component by adding material.
Marking out
Transferring the required dimensions, shape and feature positions onto material before making it.
Jig
A device that locates a workpiece or guides a tool so an operation is carried out accurately.
Former
A shaped support around or against which material is formed to produce a required shape.
Pillar drill
A machine with a drill mounted on a vertical column, used to drill controlled holes into securely held material.
Veneering
Applying a thin layer of wood to the surface of another material to improve its appearance.
Laminating
Bonding layers of timber together under pressure to build a component, which may be flat or curved.
Steam bending
Using steam to make solid timber flexible enough to bend around a former, then holding it until it dries and retains its shape.
Jointing
Connecting timber components using joints to construct a product.
Computer-aided manufacture (CAM)
Using computer-controlled machinery to manufacture parts from a digital design.
CAM cuts, engraves or marks features from digital designs. A laser uses a focused beam; a router uses a rotating cutter. Accuracy depends on the drawing, work positioning and settings. Check completed dimensions, surface quality and fit.