

Loading…
Loading…
Loading…
Eduqas GCSE Design and Technology · C600
Eduqas C600 · Prototyping Techniques and Assembly Check the specification (PDF) (opens in a new tab)
A timber product needs connections that suit both its shape and its use. A picture frame connects relatively narrow members; a cabinet connects broad panels to form a carcass, the main box-like body. These different arrangements help explain the distinction between frame joints and box/carcass joints.
Joining can be permanent or temporary. Glued timber joints are intended to remain assembled. Screws and knock-down fittings can be released, allowing parts to be separated and reassembled. This matters when a product needs to be transported, repaired or taken apart.
A joint’s shape and its fixing method work together. The shaped parts provide contact surfaces and may interlock; an adhesive or mechanical fixing holds the assembly together. Choosing a joint therefore involves strength, appearance, manufacturing difficulty and the need for dismantling.
Eduqas classifies mitre, dowel, mortise and tenon, halving and bridle as frame joints.
A mitre joint joins two ends cut at 45° to make a 90° corner. Imagine the corner of a rectangular picture frame: the diagonal meeting line gives the corner a neat appearance.
A dowel joint uses a short, round wooden peg fitted into matching holes in the two pieces. The dowel reinforces the connection. For the pieces to meet correctly, the holes must line up.
A mortise and tenon joint has a projecting tongue, the tenon, on one member. This fits into a matching rectangular socket, the mortise, in the other. The fitted parts are glued together to produce a very strong connection.
A halving joint joins pieces that meet or cross by removing half the thickness from each at the overlap. With equal-thickness timber, the remaining halves fit together so that the assembled faces are flush rather than one whole piece sitting on top of another. Halving joints can form corners, T-junctions or crossings in a frame. They are relatively quick to make and give reasonable strength when glued, or glued and screwed, making them useful for low-cost frames that will later be covered with plywood, hardboard or MDF.
To make a halving joint by hand, mark the joint positions with a pencil and try square, then use a marking gauge to mark half the timber thickness. Secure each piece in a vice and saw the shoulders—the boundaries of the overlap—with a tenon saw down to the depth line. Remove the waste and carefully pare the surfaces level with a chisel. Keep hands behind the chisel’s cutting edge, cut away from your body and wear eye protection when using a mallet. Test the fit without glue: the pieces should meet closely, align correctly and have flush faces. Only then glue and clamp the assembly, leaving it for the adhesive’s specified setting time before handling.
A bridle joint uses a similar tongue-and-slot arrangement to a mortise and tenon, but the receiving slot is open at the end of the member rather than enclosed like a mortise. The mating shapes fit together across the width of the joint.
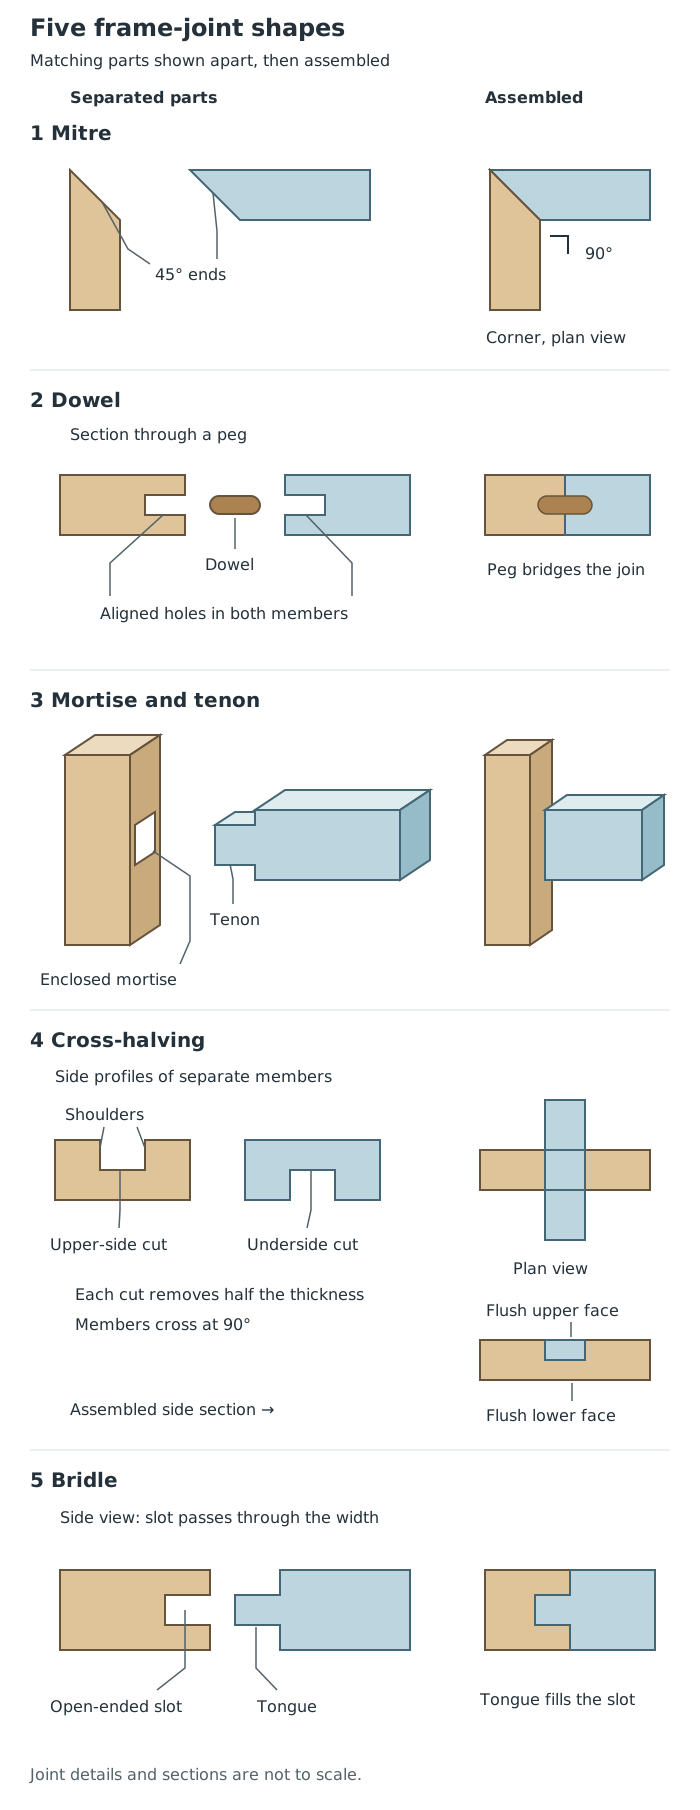
Compare angled ends, pegs, an enclosed socket, half-thickness overlaps and an open-ended slot.
Eduqas classifies butt, lap, housing, dovetail and comb as box/carcass joints. Their shapes offer different ways of connecting panel edges.
A butt joint simply places the edge or end of one piece against another and glues them together. It is straightforward to make, but is relatively weak compared with joints that overlap or interlock.
A lap joint has an L-shaped shoulder cut into one piece, into which the other fits. The overlap makes a stronger connection than a simple butt joint.
A housing joint fits the edge of one panel into a groove cut in another. For example, a shelf can fit into a housing in a cabinet side: the groove locates the shelf rather than leaving it resting against a flat surface.
A dovetail joint has flared, tail-shaped projections that fit matching recesses. This interlocking shape produces a very strong joint with an attractive appearance, but it is complex to make accurately.
A comb joint, also called a finger joint, has straight-sided projections on each piece that fit into the gaps in the other. Unlike dovetails, the fingers are not flared.
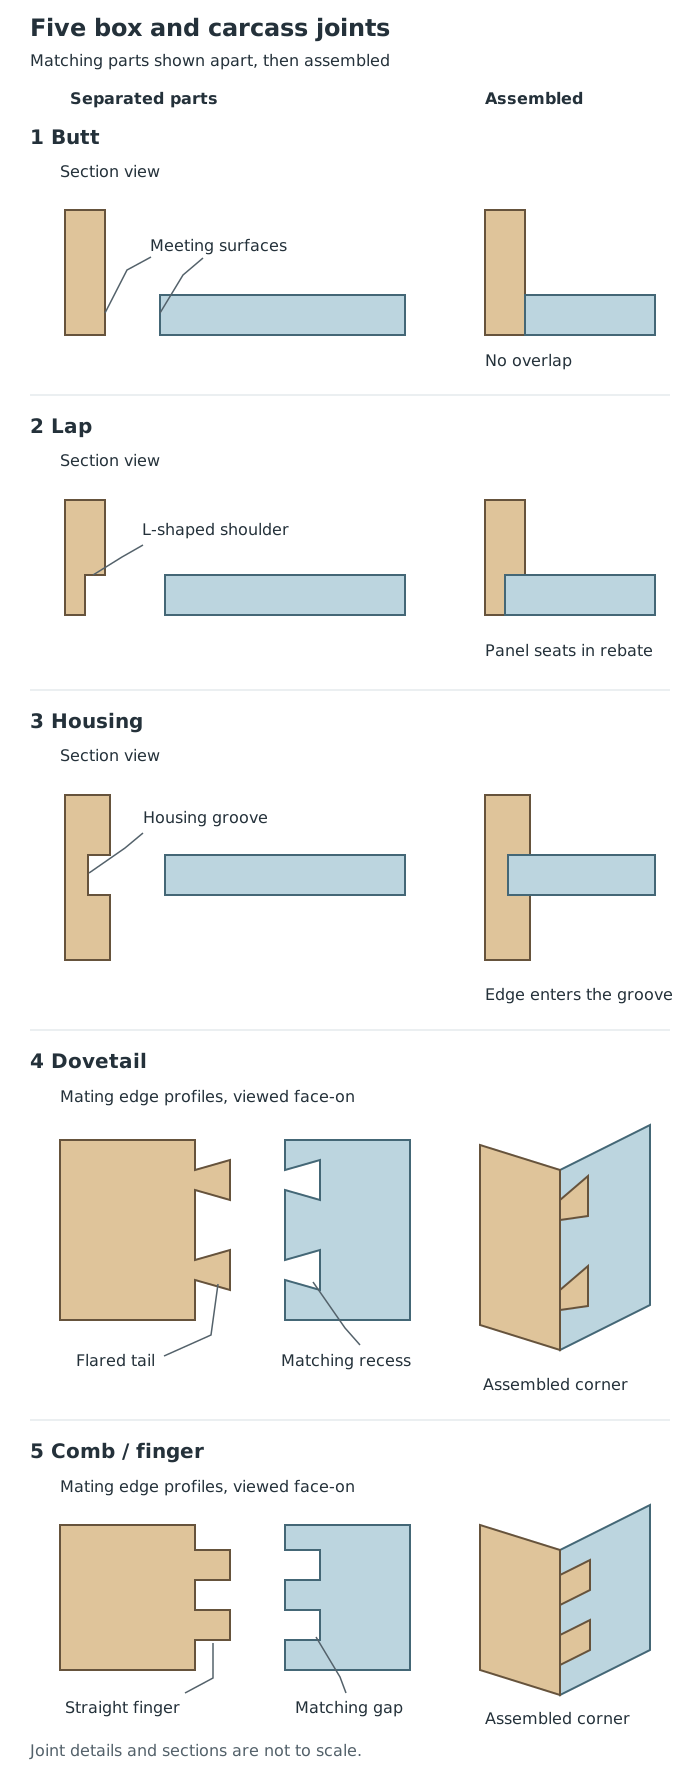
Box joints range from a simple meeting of surfaces to overlapping and interlocking shapes.
When checking shaped joints before permanent assembly, look for mating parts that align and fit together properly. Accuracy matters: the intended joint shape cannot work well if the parts do not match.
An adhesive bonds surfaces together. It must suit the materials being joined, not just the appearance of the finished product.
PVA, or polyvinyl acetate, is the specified adhesive for wood-to-wood joining. It can be used with fitted timber joints where the parts are intended to remain together.
Contact adhesive and epoxy resin are specified for joining wood to other materials. For example, attaching a different material to a timber component requires an adhesive suitable for that particular combination, rather than automatically choosing the adhesive used for an all-timber assembly.
Before using an adhesive, check its instructions for compatible materials, safe handling and the time required before the assembly can be handled. Follow the stated ventilation and skin-protection precautions; an assembly should not be treated as ready merely because the parts initially stay together.
Screws provide a temporary joining method because they can be unscrewed. Their heads may be countersunk or round, and the screwdriver must match the drive recess in the head.
A countersunk screw has a head designed to sit flush with the timber surface in a flared recess. A round-head screw normally leaves its head visible above the surface. The choice therefore affects the finished appearance as well as the connection.
Three hole types have different jobs:
In a two-piece screw connection, the screw can pass freely through a clearance hole in the first piece and grip the second piece, drawing the parts together. Where a flush head is needed, the entrance in the first piece is also countersunk.
Secure the work before drilling, wear eye protection and keep hands away from the rotating drill. Use the correct screwdriver fitting when tightening the screw. A completed connection should hold the parts together securely, with the head seated as intended.
Knock-down fittings are standard components used for products that need to be dismantled and reassembled. Examples include cam-lock fittings, corner blocks and brackets. Standard forms and sizes help manufacturers plan consistent assembly.
Consider a cabinet that must be transported in separate panels. Knock-down fittings allow it to be assembled after delivery and taken apart again. A permanently glued cabinet would not offer the same convenience. Conversely, a product intended to remain assembled may benefit from a strong glued, interlocking joint.
A good choice links the joining method to a clear need: suitable materials, adequate strength, the desired appearance and either permanent assembly or easy dismantling.
Frame: mitre, dowel, mortise and tenon, halving, bridle.
Box/carcass: butt, lap, housing, dovetail, comb.
Permanent: glued timber joints. PVA joins wood to wood; contact adhesive and epoxy resin join wood to other materials.
Temporary: screws and knock-down fittings, including cam locks, corner blocks and brackets.
Use Eduqas’s classifications: mitre, dowel, mortise and tenon, halving and bridle are frame joints; butt, lap, housing, dovetail and comb are box/carcass joints.
Justify a joining method by linking it to the materials, required strength, appearance and whether the product must come apart.
Distinguish a pilot hole, which guides a screw, from a clearance hole, which lets its thread pass through freely.
A countersunk screw head fits flush into a countersunk recess; a round head normally remains above the surface.
For a halving joint in equal-thickness timber, remove half the thickness from each mating piece so that the assembled faces are flush.
It can see this note and what your specification asks for.
Answers are free with an account.
1 free note left this week
Get more free notesYour answer sets when this note comes back for review, or marks it complete.
Was this note helpful?
Log in to tell us whether it helped, or to report a problem.
Last updated
Frame construction
An assembly of relatively narrow timber members, such as the sides of a picture frame.
Box/carcass construction
An assembly of panels forming a box-like structure, such as a cabinet body.
Permanent joint
A connection intended to remain assembled, rather than being repeatedly dismantled.
Temporary fixing
A connection that can be released so that parts can be separated and reassembled.
Halving joint
A timber joint in which half the thickness is removed from each mating piece so that they overlap with their faces flush.
PVA
Polyvinyl acetate adhesive, used to bond wood to wood.
Knock-down fitting
A standard assembly component that allows a product to be dismantled and reassembled.
Pilot hole
A small-diameter hole that guides a screw and helps prevent timber splitting.
Clearance hole
A hole large enough for a screw to pass through without its thread engaging.
Countersunk hole
A hole with a flared recess at its entrance that receives a countersunk screw head flush with the surface.
Put your knowledge into practice — try past paper questions for Design and Technology
Frame construction
An assembly of relatively narrow timber members, such as the sides of a picture frame.
Box/carcass construction
An assembly of panels forming a box-like structure, such as a cabinet body.
Permanent joint
A connection intended to remain assembled, rather than being repeatedly dismantled.
Temporary fixing
A connection that can be released so that parts can be separated and reassembled.
Halving joint
A timber joint in which half the thickness is removed from each mating piece so that they overlap with their faces flush.
PVA
Polyvinyl acetate adhesive, used to bond wood to wood.
Knock-down fitting
A standard assembly component that allows a product to be dismantled and reassembled.
Pilot hole
A small-diameter hole that guides a screw and helps prevent timber splitting.
Clearance hole
A hole large enough for a screw to pass through without its thread engaging.
Countersunk hole
A hole with a flared recess at its entrance that receives a countersunk screw head flush with the surface.
Choose by materials, strength, appearance, manufacturing difficulty and dismantling needs.