

Loading…
Loading…
Loading…
Eduqas GCSE Design and Technology · C600
Eduqas C600 · Prototyping Techniques and Assembly Check the specification (PDF) (opens in a new tab)
Joining turns separate metal components into an assembly: for example, a frame, a hinged enclosure or a removable cover. The choice affects strength, appearance, manufacturing time and whether the product can be repaired.
A permanent joint is intended to stay assembled. Separating it normally destroys the joint or its fixing, even if the metal components can be reused. Riveting, welding, brazing, silver soldering and epoxy bonding are permanent joining methods.
A temporary joint can normally be dismantled and reassembled without damaging the components. Screws and nuts and bolts are useful where a cover must be removed for maintenance. Hinges and catches provide movement and closure; they can themselves be attached using removable screws or permanent rivets.
Three questions help narrow the choice: what forces must the joint withstand, can the materials tolerate heat, and will access be needed later? Access during assembly matters too: a conventional nut and bolt needs access to both sides, whereas a blind rivet can be set from one side.
A rivet passes through aligned holes in the components. Its end is deformed so that the components are trapped between the original head and the newly formed end. No melting or adhesive is needed, making riveting useful for thin metal sheets and panels.
For a solid rivet, the main stages are:
A completed joint has a properly formed head and holds the parts securely without unwanted movement. Solid riveting requires access to both sides and can produce strong, reliable joints, such as those used in structural metalwork.
A pop rivet, also called a blind rivet, contains a pulling pin called a mandrel. Insert the rivet body through the aligned holes and place the rivet gun over the mandrel. Squeezing the handles pulls the mandrel, expanding the rivet body on the far side. The mandrel then breaks off. Check that the rivet head sits against the surface and the sheets are firmly held together.
Blind rivets are quick to fit to panels when the back is inaccessible, although they are generally less strong than solid rivets. During riveting, secure the work, wear eye protection and keep fingers clear of hammer blows and the rivet gun. Collect broken mandrels rather than leaving sharp pieces on the bench.
The parent metals are the components being joined. In welding, heat melts their contacting regions so that they fuse together when they solidify. Some methods also add filler metal. Welding is used for steel frames, vehicle structures and other assemblies needing strong permanent joints.
The main stages are to clean and prepare the joint surfaces, align and securely hold the parts, apply the weld along the required joint, then allow it to cool before handling and inspection. The parts must remain correctly positioned while the molten metal solidifies.
A finished weld should join the intended area continuously, without obvious gaps or cracks. Its appearance alone does not prove that it is strong: correct preparation, equipment settings and skilled technique are important.
Welding requires trained supervision, suitable extraction and protection from heat, sparks and intense light. Use the correct welding helmet, protective clothing and gloves, and screens to protect other people. Remove nearby flammable materials. Hot metal can look cold, so allow it to cool and use suitable handling tools.
Brazing and silver soldering differ from welding because the parent metals remain solid. A filler metal with a lower melting point than the parent metals flows into the joint and bonds them together as it cools.
Brazing is useful for close-fitting metal assemblies, including mild-steel frames and pipework. Silver soldering uses a silver-containing filler alloy and is useful for jewellery and fine metalwork. It uses more heat and produces stronger joints than ordinary soft soldering, which is commonly used for electronic connections.
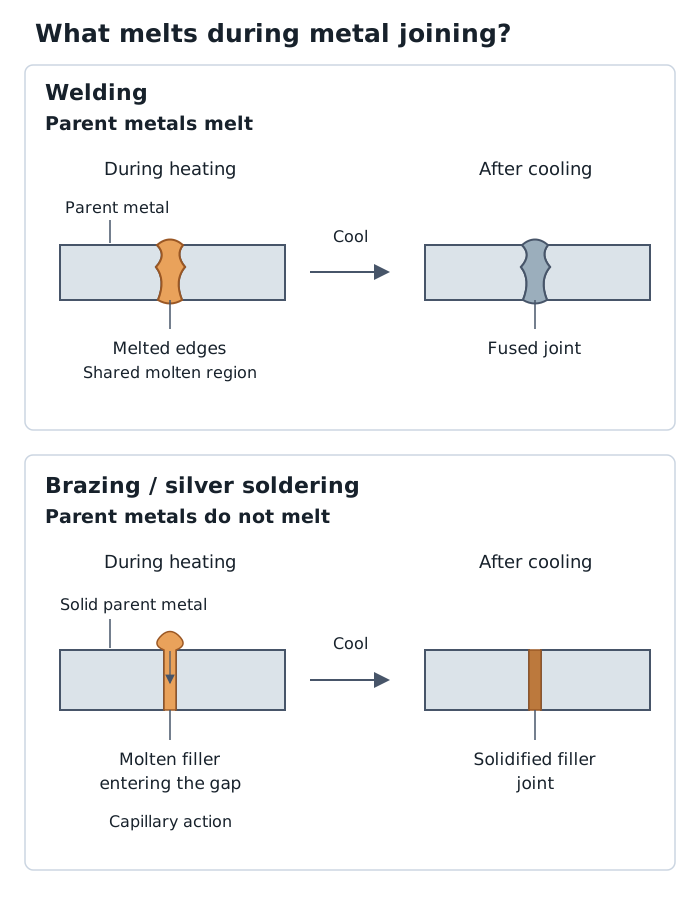
Welding fuses the parent metals. Brazing and silver soldering join solid parent metals using a molten filler.
For brazing and silver soldering, the main stages are:
In a close-fitting joint, molten filler is drawn into the narrow gap by capillary action. A successful joint has filler bonded along the intended joining area rather than simply sitting as a lump on the surface. After cooling, check that the parts remain aligned and securely joined.
For example, brazing can join metal rods and bars to make hairpin-style furniture legs. Silver soldering can close the joint in a copper ring. The filler may remain visible, so the position and neatness of the joint affect the final appearance.
Both processes require supervised torch use, eye protection, ventilation or extraction, a heat-resistant work area and removal of flammable materials. Handle hot parts with suitable tools and keep skin away from flux. Do not test the joint by touching it while it is hot.
Epoxy resin is a two-part adhesive. Mixing the resin and hardener starts a chemical reaction that cures the mixture into a strong bond. It can join dissimilar materials and is useful when welding or brazing would be unsuitable or would cause heat damage.
First check that the chosen epoxy is suitable for the materials and service conditions. Clean and degrease the surfaces, and lightly roughen them where the manufacturer's instructions require a keyed surface. Prepare only the amount needed, measuring the resin and hardener in the specified ratio and mixing them thoroughly. Do not assume every product uses equal quantities.
Apply the adhesive to the prepared joint, bring the parts together and hold them in alignment with suitable clamps or supports. Leave the assembly undisturbed for the stated curing time. An adhesive that feels hard may not yet have reached its full strength, so do not load the joint before the manufacturer's full-cure time has passed.
A completed bond should hold the correctly aligned parts securely once fully cured. A broad bonded area can spread forces across the joint. The limitations include curing time, careful surface preparation and accurate mixing.
Avoid skin and eye contact, use suitable protective gloves and work with ventilation according to the product instructions. Keep the mixing area tidy and dispose of unused adhesive safely.
Threaded fixings clamp components together. Turning the fixing moves it along its thread; tightening produces the force that holds the parts together.
A machine screw enters a matching internally threaded hole or nut. A tapped hole is a hole into which an internal thread has been cut.
To assemble a screwed joint, align the components, prepare the appropriate holes, select the correct screw length and thread, and tighten with a correctly fitting tool. Check that the head seats properly and the components are firmly held. Avoid excessive tightening, which can strip the thread or distort thin metal.
For a nut-and-bolt joint, make aligned clearance holes that allow the bolt to pass through without threading into the components. Insert the bolt, fit any required washers and start the nut by hand. Hold the bolt head with a suitable tool while tightening the nut with another. Check that the assembly is secure and correctly aligned.
A flat washer beneath the nut or head spreads the clamping load and helps protect the surface, particularly on thin sheet. Choose a bolt long enough to engage the nut fully without leaving an unnecessarily long projection.
Threaded joints are useful for removable machine guards or enclosure covers. They allow maintenance and replacement, but can loosen in use and need checking. Secure the work, remove sharp burrs and use correctly sized tools so that they do not slip.
A hinge connects a door or panel to its frame while allowing it to pivot. A catch keeps that door or panel closed until released. They do different jobs: a catch does not replace the support provided by a hinge.
For a metal enclosure, select hinges suitable for the door's weight and required movement. Position and align them, mark and prepare the fixing holes, then fasten them using suitable screws or nuts and bolts. Check that the door swings freely, clears the frame and does not bind.
A magnetic catch uses a magnet and a steel strike plate. Position them so they meet squarely when the door is closed, secure the parts and test the closure. The catch should hold the door closed while still allowing it to be opened comfortably. Correct poor hinge alignment before adjusting the catch: it should not pull a badly fitted door into place. Keep fingers clear of hinge gaps and snapping magnetic parts during testing.
When describing a joining process, give the stages in order, including surface preparation and how the joint is held while it sets or cools.
Distinguish welding from brazing and silver soldering: welding melts the parent metals; brazing and silver soldering melt a filler without melting the parent metals.
A permanent joint can sometimes be removed, but this normally destroys the joint or its fixing. Drilling out a rivet does not make riveting a temporary process.
Justify a choice using the product's needs: load, material compatibility, access, appearance, heat damage and whether dismantling is required.
A washer spreads the load beneath a nut or screw head.
It can see this note and what your specification asks for.
Answers are free with an account.
1 free note left this week
Get more free notesYour answer sets when this note comes back for review, or marks it complete.
Was this note helpful?
Log in to tell us whether it helped, or to report a problem.
Last updated
Permanent joint
A connection intended to remain assembled; separating it normally damages the joint, fixing or joined components.
Temporary joint
A connection that can be dismantled and reassembled without normally damaging the components.
Riveting
A mechanical joining process in which a rivet is deformed to hold components together permanently.
Welding
A joining process that melts and fuses the contacting regions of the parent metals to form a permanent joint.
Brazing
A process that joins heated parent metals using a molten filler metal, without melting the parent metals.
Silver soldering
A joining process using a silver-containing filler alloy and heat, without melting the parent metals.
Flux
A substance used during soldering or brazing to prevent oxidation and help molten filler flow over the joint surfaces.
Epoxy resin
A two-part adhesive whose resin and hardener react to form a strong bond.
Curing
The chemical process through which an adhesive hardens and develops its strength.
Washer
A ring-shaped fixing placed beneath a nut or screw head to spread the clamping load over a larger area.
Hinge
A mechanical component that connects parts while allowing them to pivot, such as a door and its frame.
Catch
A component that holds a door or panel closed and can be released to allow opening.
Put your knowledge into practice — try past paper questions for Design and Technology
Permanent joint
A connection intended to remain assembled; separating it normally damages the joint, fixing or joined components.
Temporary joint
A connection that can be dismantled and reassembled without normally damaging the components.
Riveting
A mechanical joining process in which a rivet is deformed to hold components together permanently.
Welding
A joining process that melts and fuses the contacting regions of the parent metals to form a permanent joint.
Brazing
A process that joins heated parent metals using a molten filler metal, without melting the parent metals.
Silver soldering
A joining process using a silver-containing filler alloy and heat, without melting the parent metals.
Flux
A substance used during soldering or brazing to prevent oxidation and help molten filler flow over the joint surfaces.
Epoxy resin
A two-part adhesive whose resin and hardener react to form a strong bond.
Curing
The chemical process through which an adhesive hardens and develops its strength.
Washer
A ring-shaped fixing placed beneath a nut or screw head to spread the clamping load over a larger area.
Hinge
A mechanical component that connects parts while allowing them to pivot, such as a door and its frame.
Catch
A component that holds a door or panel closed and can be released to allow opening.
Check secure grip, alignment and appropriate movement. Allow hot joints to cool and adhesive joints to cure fully. Use supervised heat processes, suitable eye protection, extraction and secure workholding.