

Loading…
Loading…
Loading…
Eduqas GCSE Design and Technology · C600
Eduqas C600 · Prototyping Techniques and Assembly Check the specification (PDF) (opens in a new tab)
A high-quality prototype needs a process that suits its material and shape. A plastic enclosure might begin as a flat sheet that is bent or vacuum formed. A metal bracket might be folded from sheet metal, while a cylindrical shaft could be turned on a lathe. A complex enclosure could be 3D printed directly from a digital model.
Deforming changes the shape of solid material by applying force, sometimes with heat. Reforming gives material a new shape, often by softening or melting it and allowing it to set. These processes differ from removing material by cutting or drilling, and from adding material through 3D printing. Several processes may be needed for one component.
A thermoplastic softens when heated and hardens when cooled. This makes it possible to bend a sheet of acrylic into an enclosure or stand without melting the whole sheet.
For a straight bend, use a strip heater to heat a narrow line across the sheet. Once that line becomes flexible, move the sheet into a bending jig or around a former. A former provides the required shape; the jig helps control the angle and position. Hold the plastic in place until it has cooled and become rigid, then check the angle and dimensions.
Heating only the bend line leaves the rest of the sheet relatively stiff. Removing the plastic from the former too early can allow the shape to change. Overheating can cause bubbling, burning or surface damage: flexibility, rather than smoke or bubbling, is the sign that it is ready to bend.
Tie back long hair, secure loose clothing, use heatproof gloves and keep hands away from the element and heated plastic. Work with suitable ventilation, switch off the heater after use and let both the component and equipment cool before handling them normally.
Thin sheet metal can often be cold worked: shaped without heating it first. To make a right-angle bracket, mark the bend line and clamp the sheet securely in folding bars or a suitable vice. Bend the projecting section using the appropriate folding equipment or controlled hammering. A former can help produce a particular curve or repeat the same shape on several components.
Check the bend angle and finished dimensions against the drawing. Clamping at the correct line matters because an inaccurately positioned bend changes the size of the finished bracket. Sharp sheet edges should be deburred; keep fingers clear of folding equipment and wear eye protection when hammering.
For hot working, heat the metal so that it becomes easier to shape, then bend, hammer or press it while it is still solid. Hot working can be useful when a section is too difficult to bend cold. It is not casting: the metal is not melted and poured.
Hot work requires trained supervision, suitable heat-resistant protective equipment, tongs and a designated heat-resistant working area. Hot metal may remain dangerous after it stops glowing. Leave it to cool safely before handling or checking it closely.
In casting, metal is melted in a heat-resistant container called a crucible. The molten metal is poured into a mould cavity, where it cools and solidifies. Once sufficiently cool, the casting is removed and unwanted material and rough edges are finished. The cavity determines the component’s shape, so casting can produce forms that would be difficult to make by bending sheet metal.
Sand casting uses a cavity formed in sand. It can produce a metal prototype, but the surface may need finishing. Industrial die casting injects molten metal into a metal die under pressure, allowing accurate, repeatable components; it requires specialist equipment.
Casting involves molten metal and must only be carried out with trained supervision and appropriate face, body and heat protection. Keep the pouring area clear and allow the casting to solidify and cool before removal.
Moulding also uses a cavity to determine a shape. In plastic injection moulding, granules enter through a hopper and a rotating screw moves them through a heated chamber. The melted plastic is forced into a closed mould under pressure. It cools and hardens before the mould opens and the component is ejected.
Injection moulding makes accurate, consistent parts rapidly once the tooling is ready. However, the mould and equipment are expensive, so it is usually more suitable for large quantities than a one-off school prototype. Moving mould halves, high pressure and hot material require guarded specialist equipment and trained operation.
Vacuum forming turns a thin thermoplastic sheet into a hollow shape, such as packaging or an enclosure cover. Unlike injection moulding, the sheet is shaped around a solid former, rather than molten plastic being injected into a cavity.
Place the former on the machine bed without blocking the air outlets. Clamp a suitable sheet above it and heat the sheet until it is soft and flexible. Move the heater away, raise the former into the sheet and operate the vacuum. Removing the air beneath the sheet allows atmospheric pressure above it to press the softened plastic tightly around the former.
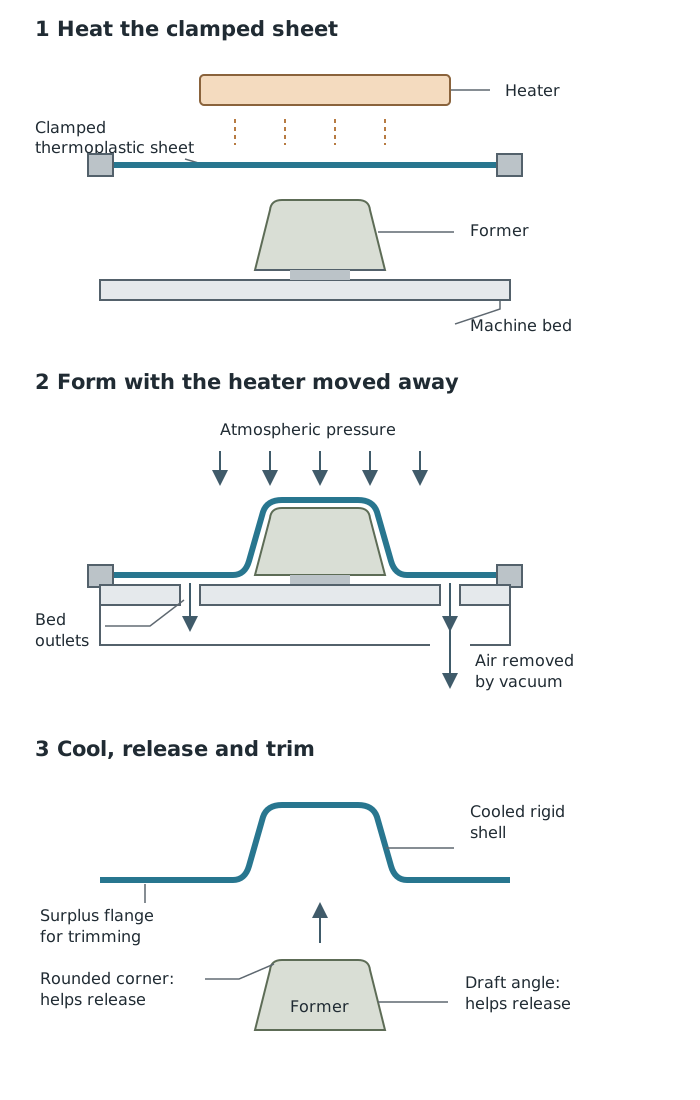
Heating makes the sheet flexible; removing air beneath it allows atmospheric pressure to press it around the former. Cooling fixes the new shape.
Allow the plastic to cool and become rigid before releasing it and extracting the former. Trim the surplus sheet and smooth the edges. Check that the intended contours have formed clearly and that the component releases without damage.
The former should be relatively simple and heat resistant. Slightly tapered sides, called draft angles, and rounded corners help the cooled plastic come off. Where necessary, small air passages help remove trapped air from detailed areas. Deep or complicated shapes are more difficult to form successfully than shallow, simple ones.
Keep hands away from heaters, hot sheet and moving parts; use the machine’s guards and operating procedure. Do not reach into the machine while it is operating. Use suitable protection when handling heated material and wait for the formed sheet to cool before removal.
Although they appear alongside forming processes, drilling and turning shape components by removing material.
Drilling makes a hole using a rotating drill bit. For a mounting hole in a bracket, mark the centre, select the correct bit and secure the component in a machine vice or clamp. Use the appropriate speed and controlled feed, then stop the machine before checking the hole or removing the work. Deburr the hole and check its position and diameter. Never hold the component by hand while drilling; wear eye protection and keep hair, clothing and jewellery clear of rotation.
Turning uses a lathe to rotate the workpiece while a cutting tool removes material. A centre lathe can make a cylindrical shaft, a stepped diameter or a taper. The workpiece is held securely in a chuck, with additional support when required, and the cutting tool is clamped in a tool post. Moving the tool along the rotating workpiece reduces its diameter; controlling its path can produce parallel or tapered sides.
Use a suitable speed and take controlled cuts. Stop the lathe before measuring the diameter or checking the fit. Remove the chuck key before starting, wear eye protection, secure hair and clothing, and never wear gloves near rotating machinery. Clear sharp swarf with an appropriate brush only after the machine has stopped.
A laser cutter uses a focused beam to cut or engrave material along a computer-controlled path. It is useful for accurate flat components, such as acrylic enclosure panels with mounting holes. Cutting passes through the sheet; engraving marks its surface.
Create the outline and details in CAD software and distinguish cutting paths from engraving details. Place an approved material on the machine bed, set the focus and choose the correct power and speed for that material and thickness. Run the extraction and send the file to the machine. Once the cycle has finished safely, remove the parts and waste, then check dimensions, holes and edge quality.
The digital file supports repeatable parts and can be edited without making a new physical template. However, a laser cutter cuts a flat sheet rather than directly producing a complete three-dimensional enclosure. School machines also have limits on material and thickness; most cannot cut metal.
Use only materials approved for that machine. Keep the enclosure closed, use extraction, never bypass interlocks and follow the workshop’s fire-monitoring procedure. Incorrect settings can leave incomplete cuts, scorching or melted edges.
3D printing builds a three-dimensional object by adding successive layers. In a common filament printer, a heated nozzle melts and deposits plastic along paths controlled by the machine. This can make a shaped enclosure or component that is difficult to produce from flat sheet.
Create a three-dimensional CAD model and export it in a suitable format, such as STL. Slicing software divides the model into layers and prepares the printer’s instructions. Choose the print orientation and add temporary supports where needed. The printer then builds the component layer by layer. When the print is finished and sufficiently cool, remove it, take off supports and check dimensions and fit.
Printing is useful for one-off prototypes because a design can be changed and printed again without making a new mould. Limitations include printing time, visible layer lines and possible finishing work. A printed component still needs checking: a digital model alone does not guarantee an accurate, usable part.
Keep clear of the hot nozzle, heated bed and moving mechanism. Use suitable ventilation and approved materials, and let the printer cool before removing the part or cleaning the build surface.
Describe a manufacturing process in sequence, naming the equipment, how the material changes shape and how the finished part is checked.
Link your choice of process to the material, shape, quantity and available equipment. A process suitable for mass production may be unsuitable for a single school-workshop prototype.
Distinguish hot working from casting: hot working shapes solid metal; casting shapes molten metal as it solidifies.
For drilling, the cutting tool rotates. For turning, the workpiece rotates against a cutting tool.
Give process-specific safety precautions, such as extraction for laser cutting or secure clamping when drilling, rather than simply writing ‘be careful’.
It can see this note and what your specification asks for.
Answers are free with an account.
1 free note left this week
Get more free notesYour answer sets when this note comes back for review, or marks it complete.
Was this note helpful?
Log in to tell us whether it helped, or to report a problem.
Last updated
Deforming
Changing the shape of a solid material by applying force, sometimes with heat, without deliberately removing material.
Reforming
Giving material a new shape, for example by softening or melting it and allowing it to set in that shape.
Thermoplastic
A polymer that softens when heated and hardens when cooled, allowing it to be reshaped within its suitable processing range.
Former
A shaped tool or solid pattern around which material is formed.
Mould
A tool containing a cavity that gives material its shape as it sets or solidifies.
Cold working
Shaping solid metal without deliberately heating it first, for example by folding sheet metal.
Hot working
Shaping heated metal while it remains solid, using forces such as bending, hammering or pressing.
Casting
Making a component by introducing molten material into a mould and allowing it to solidify.
Vacuum forming
Shaping a heated thermoplastic sheet around a former by removing the air beneath the sheet.
Draft angle
A slight taper on a former or mould surface that helps the finished component release.
Turning
Removing material from a rotating workpiece with a cutting tool, usually to produce cylindrical or tapered parts.
CAD
Computer-aided design: using computer software to create and modify a design.
CAM
Computer-aided manufacture: using computer-controlled equipment to manufacture a design.
3D printing
Making a three-dimensional object by adding material in successive layers from a digital model.
Put your knowledge into practice — try past paper questions for Design and Technology
Deforming
Changing the shape of a solid material by applying force, sometimes with heat, without deliberately removing material.
Reforming
Giving material a new shape, for example by softening or melting it and allowing it to set in that shape.
Thermoplastic
A polymer that softens when heated and hardens when cooled, allowing it to be reshaped within its suitable processing range.
Former
A shaped tool or solid pattern around which material is formed.
Mould
A tool containing a cavity that gives material its shape as it sets or solidifies.
Cold working
Shaping solid metal without deliberately heating it first, for example by folding sheet metal.
Hot working
Shaping heated metal while it remains solid, using forces such as bending, hammering or pressing.
Casting
Making a component by introducing molten material into a mould and allowing it to solidify.
Vacuum forming
Shaping a heated thermoplastic sheet around a former by removing the air beneath the sheet.
Draft angle
A slight taper on a former or mould surface that helps the finished component release.
Turning
Removing material from a rotating workpiece with a cutting tool, usually to produce cylindrical or tapered parts.
CAD
Computer-aided design: using computer software to create and modify a design.
CAM
Computer-aided manufacture: using computer-controlled equipment to manufacture a design.
3D printing
Making a three-dimensional object by adding material in successive layers from a digital model.
Clamp sheet → heat until flexible → raise former → remove air beneath sheet → cool → release and trim.
Atmospheric pressure presses the sheet around the former. Simple shapes, draft angles and rounded corners help forming and removal.
Choose using material, shape, accuracy, quantity, cost and available equipment.