

Loading…
Loading…
Loading…
Eduqas GCSE Design and Technology · C600
Eduqas C600 · Prototyping Techniques and Assembly Check the specification (PDF) (opens in a new tab)
Assembly brings individual parts together into a working product. In an electronic device, this might mean securing the enclosure, attaching a bracket and joining components to a circuit board. These connections have different jobs: an enclosure may need to open for repairs, whereas a circuit-board connection must also conduct electricity.
A temporary joint can normally be undone and reassembled without damaging the parts. Nuts, bolts and removable screws are useful where a product needs adjustment, maintenance or replacement components. Here, ‘temporary’ describes the ability to dismantle the joint—not how long it will last.
A permanent joint is not intended for routine dismantling. Riveting, adhesive bonding and soldering are examples. Removal may still be possible, but it usually destroys a fastener or breaks a bond and requires the joint to be remade.
A bolt passes through aligned holes in the parts. A matching nut screws onto its threaded end. Tightening the nut clamps the parts between the bolt head and the nut, producing a strong mechanical joint that can later be undone.
A plain washer sits between the fastener and the material surface. Its larger contact area spreads the clamping load, reducing pressure and helping prevent the nut or bolt head from damaging the surface. It can also act as a spacer. The washer supports the fastening; the bolt and nut provide the clamping action.
For example, a removable metal bracket could be bolted to an enclosure so it can be replaced without destroying the enclosure. Select a bolt of suitable diameter and length, use a matching nut and tighten until the parts are secure without crushing or distorting them. Use correctly fitting tools and check that the joint does not move unintentionally.
Vibration can gradually loosen threaded fasteners. Where vibration matters, an appropriate locking arrangement may be needed. A plain washer spreads the load, but is not a vibration-locking device.
A screw engages with a threaded hole or forms a thread in suitable material. Unlike a typical nut-and-bolt joint, it does not necessarily need a separate nut behind the workpiece. This makes screws useful for removable covers and situations where access to the back is difficult.
A wood screw has a tapered, pointed end and threads that grip the wood. Preparing a suitable pilot hole reduces the risk of splitting: a hole that is too small can cause cracking, while one that is too large leaves too little material for the thread to grip.
Use a screwdriver or driver bit that matches the screw head. Tighten until the parts are held firmly, without damaging the head, stripping the thread or crushing the material. Check that the cover or component sits correctly and remains secure.
A rivet joins parts by being permanently deformed. It is especially useful for overlapping sheets, including steel and aluminium. The rivet passes through aligned holes, then its end is enlarged so the sheets are held between two retaining ends.
A blind rivet, often called a pop rivet, can be installed with access from only one side. A riveting tool pulls its central stem, deforming the rivet body behind the sheets to clamp them together. A solid rivet normally requires access to both sides so its end can be formed.
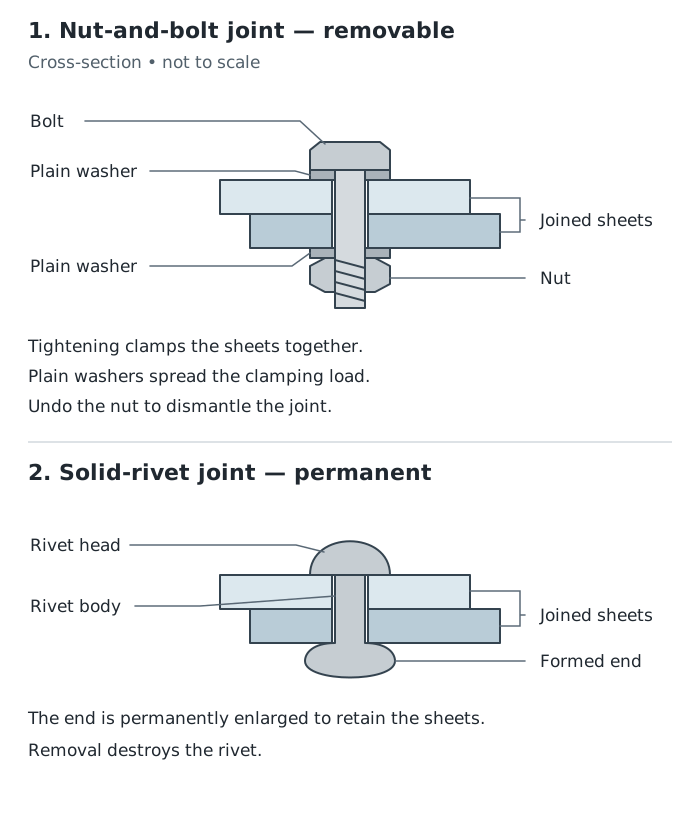
Both joints hold sheets mechanically. The nut-and-bolt joint can be undone; the rivet is permanently deformed.
For example, overlapping aluminium sheets forming a fixed casing can be riveted when routine dismantling is unnecessary. Support and align the sheets, use the correct rivet and tool, and wear eye protection. Keep fingers clear of the tool mechanism. The completed joint should hold the sheets tightly, with the rivet properly formed and no unwanted movement. Removing it normally requires destroying the rivet, often by drilling it out.
Like materials are the same material, such as aluminium joined to aluminium. Unlike materials are different, such as a metal bracket attached to a plastic enclosure. Neither situation has one universally correct joining method.
Mechanical joints hold parts through clamping, engagement or deformation. They can join unlike materials because the materials do not need to bond chemically. However, the fastener must not crack, crush or pull through the weaker part. Spreading the load with a suitable washer can help protect a surface.
Adhesives provide another route: a chemical bonding method rather than a separate mechanical fastener. Epoxy, cyanoacrylate and polyurethane adhesives have different properties. Selection depends on compatibility with both materials, required strength, flexibility, temperature resistance and setting time. An adhesive suitable for one plastic may not be suitable for another.
Surface preparation is important. Clean away contamination and, where the adhesive instructions require it, roughen the bonding surfaces. Apply the adhesive as directed, align the parts and hold or clamp them while the bond develops. A joint that initially stays in place may not yet have reached its full cured strength: wait for the specified curing time before loading it. Follow the product’s safety instructions, provide appropriate ventilation and avoid skin and eye contact.
Adhesives can distribute the load over a contact area and avoid drilling fastening holes, but they make later dismantling more difficult. A removable mechanical joint is usually more suitable when regular access is a priority.
Soldering uses a filler metal that melts at a lower temperature than the metal parts being joined. The solder melts; the component lead and circuit-board connection remain solid. Once cooled, the joint holds the connection together and provides an electrically conducting path.
For a typical through-hole component, the lead passes through a hole in a printed circuit board (PCB). It is soldered to the metal pad around the hole, which connects to a conducting track. Check the component’s position and orientation before joining it: some components must be fitted the correct way round.
With the circuit disconnected from power, secure the board and component so they cannot move. Let the soldering iron heat up in its stand. Clean its tip using the suitable damp sponge or brass cleaner, then apply a thin coating of solder to the tip. This is called tinning and helps transfer heat into the joint. Electronics solder usually contains flux, which helps clean the metal surfaces so molten solder flows onto them.
Touch the iron to both the component lead and the pad at the same time. After they have heated, feed a little solder directly into the joint—not onto the iron to wipe onto the board. The solder should flow onto both surfaces. Remove the solder wire, then the iron, and keep the connection still while the solder solidifies. Avoid prolonged heating, which can damage components or the board.
Use eye protection and suitable fume extraction, keeping your face out of the fumes. Never touch the hot tip or element, keep them away from cables, and return the iron to its stand whenever it is not in use. Allow the joint to cool before handling it. Trim excess component leads with suitable cutters, controlling the offcuts so they do not fly towards anyone. Switch off the iron after use and wash your hands after handling solder.
Inspect the cooled joint closely. The solder should cover the pad and flow smoothly onto the lead, usually forming a small volcano-like shape rather than a separate ball. Keep neighbouring joints clearly separated: a solder bridge connecting pads that should be separate can cause a short circuit. Check that no bent leads touch unintended connections. If the solder has not flowed onto both surfaces, or the joint moved while cooling, it may need reheating; excess solder can be removed with solder wick or a desoldering pump. Check the completed assembly before reconnecting power.
Choose the joint by asking what it must achieve. A screwed cover allows servicing; a riveted sheet-metal casing provides a permanent mechanical connection; an appropriate adhesive can join compatible unlike materials; soldering provides an electrical connection on a circuit board. Consider strength, access for assembly, vibration, temperature, surface damage and future repairs together rather than selecting a method on strength alone.
Justify a joining method using the materials, required strength, working conditions and need for future disassembly—not simply ‘it is strong’.
Permanent does not mean impossible to remove: a rivet can be drilled out, but the rivet is destroyed.
A washer spreads the load; it does not replace the nut or create the fastening by itself.
Do not assume that every adhesive bonds every plastic or that an ordinary spring washer reliably prevents vibration loosening.
For soldering, distinguish melting the solder from melting the component lead or circuit-board connection.
It can see this note and what your specification asks for.
Answers are free with an account.
1 free note left this week
Get more free notesYour answer sets when this note comes back for review, or marks it complete.
Was this note helpful?
Log in to tell us whether it helped, or to report a problem.
Last updated
Assembly
The process of putting parts and components together to make a product or system.
Mechanical joint
A connection that holds parts together through physical engagement, clamping or deformation, such as a screwed, bolted or riveted joint.
Adhesive bond
A connection made using an adhesive that bonds the surfaces of materials together.
Permanent joint
A connection not intended for routine disassembly; separating it normally destroys the fastener or damages the bond or joined parts.
Temporary joint
A connection designed to be undone and reassembled without normally damaging the joined parts, such as a nut-and-bolt joint.
Washer
A thin piece placed between a fastener and a surface, commonly to spread the clamping load and reduce surface damage.
Pilot hole
A smaller hole prepared before inserting a screw, helping guide it and reduce the risk of splitting the material.
Rivet
A fastener permanently deformed after insertion through aligned holes to hold parts together.
Soldering
A joining process in which a low-melting-point filler metal melts and bonds metal surfaces while the joined parts remain solid.
Put your knowledge into practice — try past paper questions for Design and Technology
Assembly
The process of putting parts and components together to make a product or system.
Mechanical joint
A connection that holds parts together through physical engagement, clamping or deformation, such as a screwed, bolted or riveted joint.
Adhesive bond
A connection made using an adhesive that bonds the surfaces of materials together.
Permanent joint
A connection not intended for routine disassembly; separating it normally destroys the fastener or damages the bond or joined parts.
Temporary joint
A connection designed to be undone and reassembled without normally damaging the joined parts, such as a nut-and-bolt joint.
Washer
A thin piece placed between a fastener and a surface, commonly to spread the clamping load and reduce surface damage.
Pilot hole
A smaller hole prepared before inserting a screw, helping guide it and reduce the risk of splitting the material.
Rivet
A fastener permanently deformed after insertion through aligned holes to hold parts together.
Soldering
A joining process in which a low-melting-point filler metal melts and bonds metal surfaces while the joined parts remain solid.
Like or unlike materials? Required strength? Vibration or heat? Access to both sides? Surface damage? Need for repair or dismantling?