

Loading…
Loading…
Loading…
Edexcel GCSE Design and Technology · 1DT0
Edexcel 1DT0 · 7.7.3 Fabricating and Constructing Check the specification (PDF) (opens in a new tab)
A timber joint connects components and keeps them in the position required by the design. A picture-frame corner, a cupboard shelf and a drawer front all need connections, but they face different demands. The frame needs neat corners; the shelf needs support; the drawer front must withstand repeated pulling.
Joint selection therefore involves balancing strength, appearance, manufacturing time and the accuracy that can be achieved. Shaped joints can provide extra contact area for adhesive and can physically support or interlock with another component. However, removing timber also reduces the material remaining around the joint, so accurate proportions and cutting matter.
End grain is the surface exposed when timber is cut across its fibres. It absorbs adhesive readily, and a joint relying only on glued end grain is relatively weak. This helps explain why a simple butt or mitre joint is less suitable for a heavily loaded connection than a well-made interlocking joint.
A butt joint is made by placing the end or edge of one piece against another, without cutting interlocking shapes. At a box corner, the square-cut end of one board can meet the face of the adjoining board.
It is useful for simple boxes and frames because it is quick to make and needs little specialist equipment. A tenon saw makes the square cut, and a try square checks it. Its main disadvantage is low strength: it can be easily damaged, particularly if the connection relies on adhesive at the end grain. Screws or nails can reinforce it where their appearance and position are acceptable.
To make it, mark the required length, support the timber securely and saw the end square. Dry-fit the pieces and check that their contact surfaces meet closely and the corner is square before fixing them together.
A dowel joint strengthens the connection using round wooden pins fitted into matching holes in both pieces. The dowels help locate the components and provide additional glued contact inside the holes. Dowel joints are used in frameworks and furniture, including flat-pack furniture.
After cutting the components to size with a tenon saw, mark corresponding hole positions and drill them square to the joining surfaces. A dowelling jig helps guide the drill and keep positions consistent. Test the fit with the dowels before applying adhesive and clamping the joint.
A dowel joint is stronger than a plain butt joint and the dowels can be concealed. Its limitation is drilling accuracy: if the holes do not line up, the pieces may sit out of alignment or fail to close. The holes must also be deep enough to accommodate the dowels without preventing the surfaces from meeting.
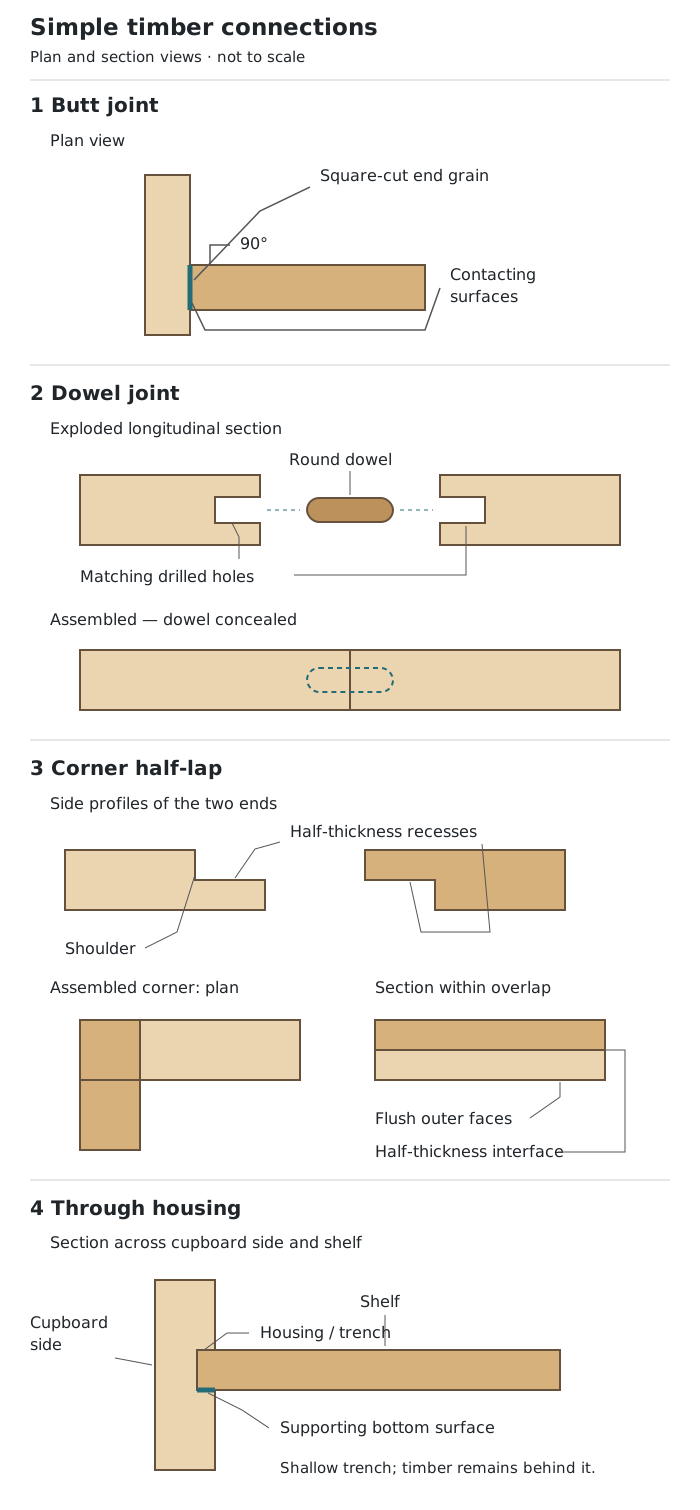
Compare a simple contact, dowel reinforcement, a flush overlap and a supporting trench.
In a lap joint, the pieces overlap. A common version is the half-lap joint, where half the thickness is removed from each of two equal-thickness components. When the cut areas overlap, the outer faces finish flush rather than one piece sitting proud of the other.
Half-laps are useful for frameworks and right-angled frame connections. The overlapping surfaces provide an area for adhesive, and the shoulders help locate the pieces. They produce a flush connection, but cutting away timber reduces the section at the joint. They are not the best choice where very high strength is required, and a halving joint is unsuitable for chipboard.
Use a try square to mark the overlap width and a marking gauge to mark half the thickness. Saw on the waste side of the shoulder lines with a tenon saw, then remove the waste carefully with a chisel. The finished recesses should have flat surfaces and matching depths. During the dry fit, check that the pieces meet without gaps and their faces are flush.
A housing joint works differently: the end of a component fits into a trench cut across another component. A cupboard shelf seated in a housing in the cupboard side is a typical example. The bottom of the trench supports the shelf, while its sides help locate it.
Mark the trench width to match the shelf thickness, using a try square to carry the lines across the board. Saw its boundaries with a tenon saw and remove the waste with a chisel. Keep the trench shallow enough to leave sufficient timber behind it; a depth no greater than about one-third of the receiving board's thickness is a useful guide.
A housing provides a stronger, better-supported shelf connection than simply butting its end against the cupboard side. Its disadvantage is the accuracy required: an oversized trench leaves a loose fit, while an undersized one prevents assembly. Cutting too deeply weakens the cupboard side. A stopped housing ends before the front edge, concealing the trench for a neater appearance.
A mitre joint joins ends cut at matching angles. For a square picture frame, each end is cut at 45°, producing a 90° corner when the two pieces meet.
The angled cuts conceal the end grain and allow the grain pattern to continue visually around the corner. This makes mitres useful for picture frames and window frames where appearance matters.
Use a tenon saw with a mitre block to guide the angle. Cut the matching ends, bring them together and check both the angle and the contact along the cut faces. Hold the pieces in alignment during gluing, using an appropriate frame or mitre clamp.
The weakness is that a plain mitre has little resistance to being pulled apart and relies heavily on the glued surfaces. It is also difficult to cut accurately: a small angular error produces a visible gap. A mitre is therefore a good choice for a neat, lightly loaded corner, but a plain glued mitre is not automatically suitable for a load-bearing furniture frame.
A mortise and tenon joint consists of a projecting rectangular tongue, the tenon, fitted into a matching hole, the mortise. The tenon has shoulders that meet the surface around the mortise when the joint is fully assembled.
The fitted shapes and substantial glued contact make this a strong connection for doors and furniture frames, such as the connection between a chair rail and a leg. The shoulders help locate the rail and give a neat finish. In a stopped mortise, the hole does not pass through the component, so the tenon's end grain is concealed. A through mortise and tenon exposes the tenon on the opposite face.
A mortise gauge marks the two parallel lines defining the mortise and tenon thickness. A try square marks the shoulders. The tenon is commonly about one-third of the timber thickness, leaving material on either side of the mortise.
Cut the mortise with a suitable chisel, or a mortiser under trained supervision. Saw the tenon's cheeks and shoulders with a tenon saw, keeping to the waste side of the lines. Pare only small amounts when adjusting the fit.
The joint should slide together firmly by hand, with the shoulders closing against the receiving piece. Its main disadvantage is the time and skill needed for accurate cutting. A loose tenon leaves gaps and reduces the quality of the connection; an excessively tight one can split the timber if forced in.
A dovetail joint uses tapered tails that fit between matching pins. Unlike straight-sided fingers, the tails widen towards their ends. Their shape mechanically prevents the joint from pulling apart in the direction restrained by the tails.
This is particularly useful where a drawer front meets its sides: pulling the front places a separating force on these connections. Dovetails provide good strength and can also be an attractive feature of high-quality drawers and furniture.
Mark the timber thickness with a marking gauge and set out the pins and tails accurately. A fine-toothed dovetail saw cuts the sides, and a chisel removes waste between them. One cut component can be used as a template to mark its partner, helping the shapes match. A dovetail jig can guide machine cutting where suitable equipment is available.
Remove chisel waste from each side of the board to reduce splintering, using a solid backing board. Dry-fit the components and check the corner with a try square before gluing. The pins and tails should meet closely, without forcing or twisting the assembly.
The disadvantage is the difficulty of accurate hand manufacture. Small errors in the slopes or spacing can leave gaps or prevent assembly, so dovetails take longer to make than a simple butt joint.
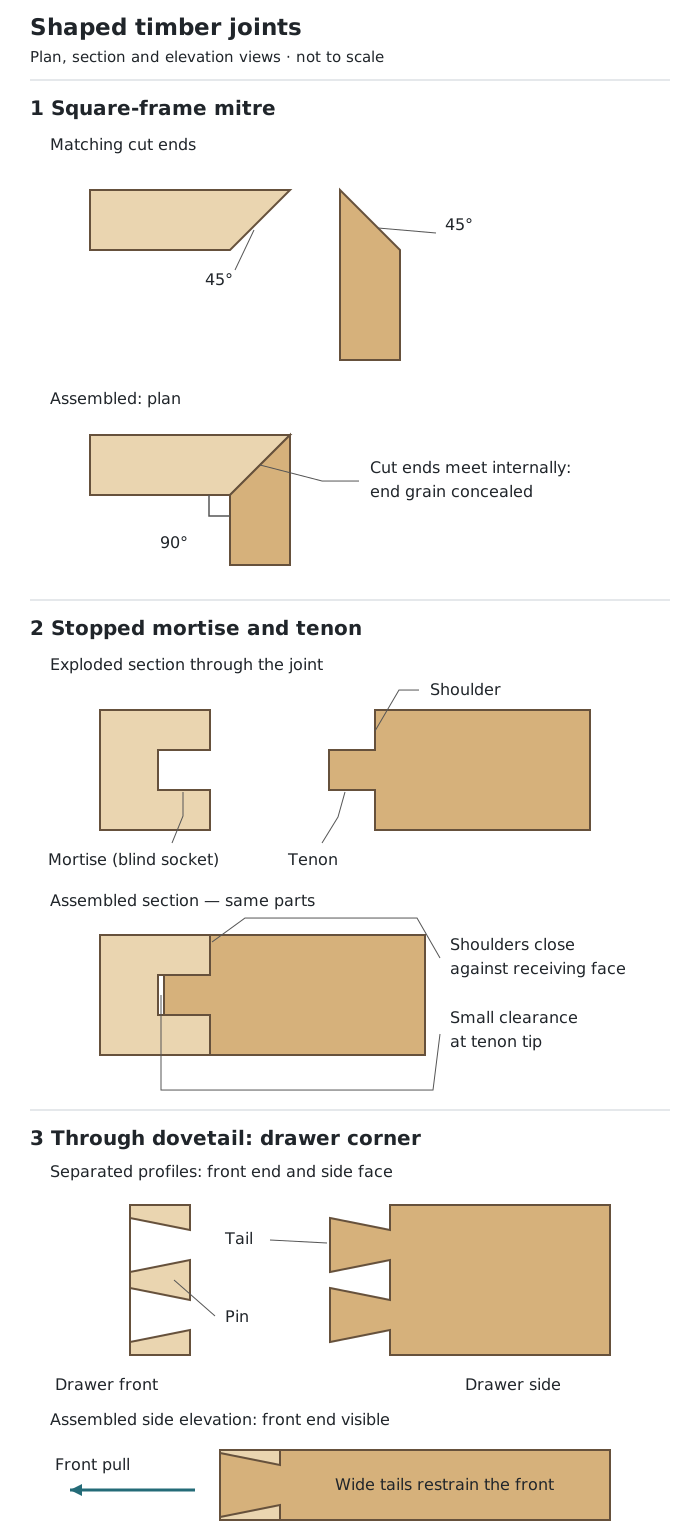
A mitre prioritises a neat corner; mortise and tenon and dovetail joints use fitted shapes for stronger connections.
Accurate work begins with secure support. Use a vice, clamp or bench hook appropriate to the operation rather than holding loose timber close to a cutting tool. Keep hands out of the saw's path and behind the cutting edge of a chisel. Support timber on a backing board when chiselling, and remove waste in controlled amounts rather than forcing the tool.
Clamp timber before drilling, wear eye protection and keep loose clothing and hair away from rotating machinery. Powered equipment, including a mortiser or machine used with a jig, requires training, supervision and the correct guards. Use dust extraction where provided and follow workshop instructions for dust protection and adhesive use.
Before gluing, dry-fit the joint. It should close by hand without excessive force, have close-fitting contact surfaces and maintain the intended angle. For a rectangular frame, compare the diagonals: equal diagonal lengths help confirm that it is square.
During final assembly, use enough clamping pressure to close the joint without distorting it. Remove excess adhesive and leave the assembly supported for the adhesive's stated setting time. Once set, check that the joint is secure, aligned and free from open gaps before cleaning up the surfaces.
Choose according to the job, not simply the most complicated joint. A butt joint may be sufficient for a simple, lightly loaded box, particularly with suitable reinforcement. A dowel joint improves strength while concealing the connecting pins. A half-lap gives a flush frame connection, while a housing gives a shelf a supporting seat.
For an appearance-led picture frame, a mitre conceals end grain, but its limited strength must be acceptable. For a loaded furniture frame, a mortise and tenon offers greater strength. For a drawer connection that must resist repeated pulling, the interlocking shape of a dovetail is particularly valuable. In each case, the benefit must be weighed against cutting accuracy, available tools and manufacturing time.
| Joint | Typical application | Main advantage | Main limitation |
|---|---|---|---|
| Butt | Simple boxes and frames | Quick, simple construction | Low strength; easily damaged |
| Dowel | Frameworks and furniture | Stronger than a plain butt; concealed pins | Matching holes need accurate drilling |
| Lap/half-lap | Frameworks | Overlap; half-lap gives flush faces | Timber is removed; accurate depths needed |
| Housing | Cupboard shelves | Trench supports and locates the shelf | Accurate width and depth needed |
| Mitre | Picture and window frames | Conceals end grain; neat grain continuity | Weak plain connection; angle errors leave gaps |
| Mortise and tenon | Doors and furniture frames | Strong fitted connection | Time-consuming, accurate cutting required |
| Dovetail | Drawers and furniture | Tapered interlock resists separation | Difficult to cut accurately by hand |
Justify a joint choice using the product: for example, a housing supports a cupboard shelf, while a dovetail resists a drawer front being pulled away from its sides.
Give a disadvantage as well as an advantage when comparing joints. Greater strength can come at the cost of more accurate marking, cutting and assembly.
Distinguish a housing from a half-lap: a housing receives the end of another piece; a half-lap removes half the thickness from both overlapping pieces.
Do not assume every mortise and tenon hides the end grain. A stopped mortise conceals the tenon, whereas a through tenon is visible on the opposite face.
When describing manufacture, name the tool and its purpose rather than simply listing tools.
It can see this note and what your specification asks for.
Answers are free with an account.
1 free note left this week
Get more free notesYour answer sets when this note comes back for review, or marks it complete.
Was this note helpful?
Log in to tell us whether it helped, or to report a problem.
Last updated
Timber joint
A connection between timber components that holds them in the required position.
End grain
The surface exposed when timber is cut across its fibres, such as the end of a board.
Butt joint
A connection in which one piece of timber meets another without interlocking shaped parts.
Dowel joint
A connection strengthened by wooden pins fitted into matching holes in the two components.
Lap joint
A connection in which two pieces of timber overlap. In a half-lap, half the thickness is removed from each piece so their faces finish flush.
Housing joint
A connection in which the end of one timber component fits into a trench cut across another.
Mitre joint
A connection between two ends cut at matching angles, normally two 45° cuts forming a 90° corner.
Mortise and tenon joint
A connection in which a projecting tongue, the tenon, fits into a matching rectangular hole, the mortise.
Dovetail joint
A connection made from interlocking tapered tails and matching pins, which resist being pulled apart in the direction restrained by the tails.
Dry fit
Assembling components without adhesive to check their fit and alignment before permanent assembly.
Put your knowledge into practice — try past paper questions for Design and Technology
Timber joint
A connection between timber components that holds them in the required position.
End grain
The surface exposed when timber is cut across its fibres, such as the end of a board.
Butt joint
A connection in which one piece of timber meets another without interlocking shaped parts.
Dowel joint
A connection strengthened by wooden pins fitted into matching holes in the two components.
Lap joint
A connection in which two pieces of timber overlap. In a half-lap, half the thickness is removed from each piece so their faces finish flush.
Housing joint
A connection in which the end of one timber component fits into a trench cut across another.
Mitre joint
A connection between two ends cut at matching angles, normally two 45° cuts forming a 90° corner.
Mortise and tenon joint
A connection in which a projecting tongue, the tenon, fits into a matching rectangular hole, the mortise.
Dovetail joint
A connection made from interlocking tapered tails and matching pins, which resist being pulled apart in the direction restrained by the tails.
Dry fit
Assembling components without adhesive to check their fit and alignment before permanent assembly.