

Loading…
Loading…
Loading…
Edexcel GCSE Design and Technology · 1DT0
Edexcel 1DT0 · 7.7.3 Fabricating and Constructing Check the specification (PDF) (opens in a new tab)
Fabricating and constructing turn separate materials into a usable component or product. The method chosen affects its shape, strength, appearance and whether it can later be taken apart. A curved component, a decorative panel and a removable assembly therefore need different approaches.
Lamination bonds layers of timber together. Thin layers can be arranged around a former, a shaped support that establishes the required curve. Adhesive between the layers holds them together once it has set.
Prepare the layers and check that they fit around the former before applying adhesive. Spread a suitable wood adhesive evenly between the layers, then hold them against the former. Clamps or a vacuum bag apply pressure while the adhesive sets. PVA is commonly used for school timber lamination, but the adhesive grade must suit the intended conditions and loading: ordinary indoor wood glue is not automatically suitable for an outdoor structure.
Protect the work from clamp marks and keep fingers clear as clamps are tightened. Follow the adhesive manufacturer's instructions for clamping and full curing time. Being ready to remove the clamps does not necessarily mean that the bond has reached full strength. After sufficient curing, check that the component holds its intended shape and that the layers have no visible gaps or separation. It can then be trimmed to its final size using securely supported work and appropriate eye protection.
Lamination is useful when a designer wants strength or a curved shape, rather than a component made from one solid piece. Applications include tables and timber structures such as bridges. It allows the shape to be built up from thinner layers, but requires a former, pressure and curing time. The edges may reveal the individual layers, which affects the appearance. Moisture can also damage inadequately protected laminated constructions and cause delamination, where layers separate.
Veneering bonds a thin, attractive layer of timber over a cheaper base. The base forms the main body of the component, while the veneer provides the visible timber surface. For example, a furniture panel can have an attractive timber face without being made entirely from that timber. This makes economical use of decorative timber, although the thin surface can be damaged or sanded through.
The important distinction is the purpose of the layers. Lamination builds up the component itself; veneering mainly changes the surface appearance. A veneer is not a substitute for choosing a suitable base material.
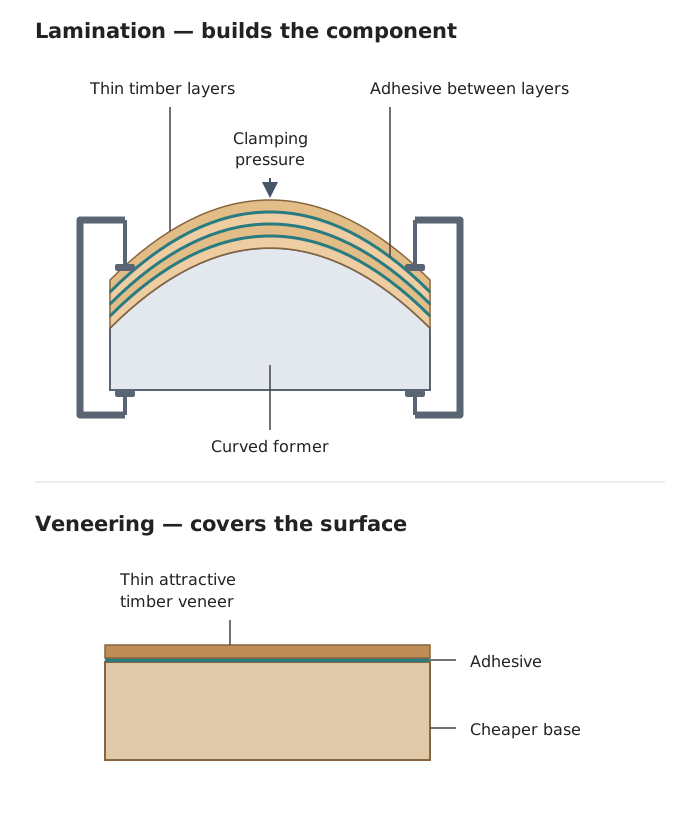
Lamination builds up a component from bonded layers; veneering adds a thin decorative timber surface to a base.
Choose an adhesive compatible with both the veneer and the base. PVA can bond suitable porous wood surfaces where pressure can be maintained during setting. Contact adhesive is useful for compatible backed veneers and edge veneering, but should not be assumed suitable for every veneer: raw, unbacked veneer needs an appropriate veneering adhesive rather than an automatic choice of contact adhesive.
Prepare clean, smooth, dust-free surfaces and check the veneer's size and alignment before gluing. For a PVA bond, spread the adhesive evenly and use a flat protective board with clamps or a suitable press to distribute pressure while it sets. For contact adhesive, follow the two-surface procedure below. After the required curing period, trim excess veneer carefully with the panel supported and hands clear of the cutting path. Sand lightly because the veneer is thin. A satisfactory surface is firmly bonded, with no lifted edges or bubbles; light shining across it helps reveal raised areas.
Mechanical fixings hold components together using physical fasteners. Screws provide a strong fixing and can be removed, making them useful where a product may need dismantling, such as a screwed-on furniture hinge. Their disadvantages include visible heads and the extra preparation needed for a neat fixing.
Choose a screw with a suitable length and diameter: it must grip the receiving timber without emerging through the far side. Match the screwdriver or driver bit to its head. Mark the positions, support and clamp the pieces, and wear eye protection when drilling.
A pilot hole in the receiving timber is smaller than the screw's outside thread diameter, leaving material for the threads to grip. It reduces driving resistance and the risk of splitting, particularly in hardwood or thin timber. A clearance hole through the first piece lets the screw pass freely, so its head can pull that piece tightly against the receiving timber. For a countersunk screw, cut a tapered recess so the head can sit flush; a domed head does not need this recess.
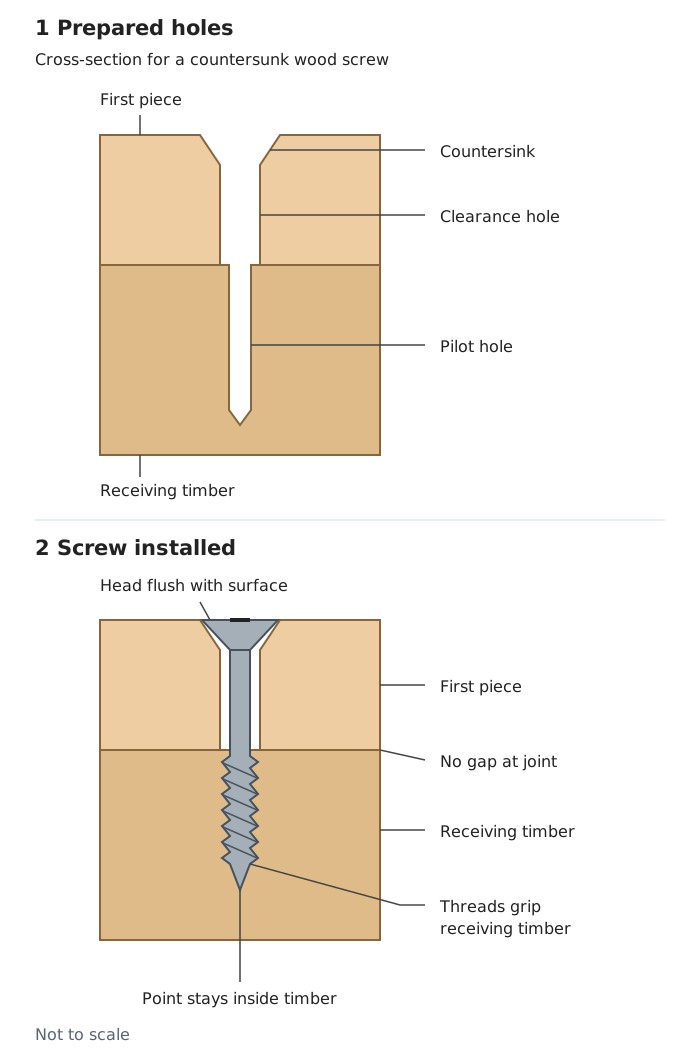
The clearance hole lets the screw pull the first piece tight; the pilot hole reduces splitting while allowing the threads to grip.
Drive the screw steadily without overtightening, which can damage the head, crush the surface or strip the grip. Check that the pieces meet without a gap, the fixing does not move and the head sits as intended. A deeper screw head is not a remedy for a joint that has failed to pull together.
Nails provide a quick way of fixing components, so speed of assembly can favour nailing. They are less convenient than screws when controlled dismantling is important: pulling them out can damage the timber.
Choose a nail long enough to penetrate the receiving piece securely without leaving an exposed point. Avoid placing nails too close to an edge, where splitting is more likely. A pilot hole slightly smaller than the nail can help protect thin or easily split timber while retaining enough grip.
Support the work securely, wear eye protection and keep fingers away from the striking area. Start the nail with light taps, then drive it straight using controlled hammer blows. Check that it is seated properly, the pieces are held tightly, and there are no splits, projecting points or bent nails.
Adhesives bond surfaces rather than holding them with a separate screw or nail. PVA, or polyvinyl acetate, is a water-based wood adhesive suitable for porous timber surfaces, including two flat pieces of pine joined edge to edge. It is inexpensive, easy to apply and excess wet glue can be cleaned with a damp cloth. It is not suitable for every material combination, such as bonding metal to timber.
Dry-fit the pieces first: PVA is not a substitute for accurately fitting surfaces. Apply an even layer, assemble the pieces and clamp them in alignment without distorting them. Remove excess glue carefully before it dries, since residue can spoil later staining or finishing. Avoid skin and eye contact and follow the product's safety instructions.
Keep the assembly supported for the specified clamping time and allow full curing before loading it. Check that the pieces remain aligned and the bond line has no open gaps. Standard PVA is mainly for dry indoor work; moisture exposure requires a suitably rated adhesive. PVA also needs setting time, and some grades can slowly deform under sustained load, so it is not the best choice for every application.
Contact adhesive is useful for securing plastic laminates to timber, edge veneers and compatible backed wood veneers. It offers an immediate bond without prolonged clamping, but accurate positioning is essential because the surfaces cannot readily be slid into place after they touch.
Prepare clean, dry, dust-free surfaces, roughening smooth surfaces if the manufacturer's instructions require it. Coat both faces evenly. Wait for the specified readiness stage: for typical solvent-based contact adhesives, the solvent must evaporate until the coating is tacky rather than wet. Follow the product instructions rather than assuming that one drying time suits every adhesive or workshop condition.
Align the pieces carefully. Separator strips can keep a large sheet from touching the base until it is correctly positioned. Bring the surfaces together progressively from the centre outwards and apply firm, even pressure with a suitable smoothing tool, avoiding trapped air. Inspect for bubbles, loose edges and incomplete contact. The initial bond is immediate, but full strength develops during curing.
Use good ventilation, avoid breathing vapours and follow the specified protective-equipment guidance. Solvent-based products must be kept away from flames, sparks and other ignition sources. This safety requirement, together with difficult repositioning, can make PVA preferable where porous timber surfaces can be clamped and time is available.
Addition builds up a product by adding material or joining components. Bonding timber layers during lamination and applying a veneer are examples.
Wastage removes material to reach the required shape or size. Trimming a laminated component after bonding is an example. It describes a manufacturing method, not just careless use of resources. Accurate marking out and planning can reduce unnecessary offcuts.
One manufacturing sequence can therefore use both approaches: first build up the component, then remove excess material to finish it. Selecting a method means balancing the required shape, surface appearance, strength, assembly time and need for dismantling—not simply choosing the strongest fixing in every situation.
Select by shape, appearance, strength, assembly speed, exposure conditions and need for dismantling.
Justify a choice by linking a property to the product: screws are removable, so they suit an assembly that may need dismantling.
Distinguish lamination, which builds up a component, from veneering, which covers a base with a thin decorative layer.
When comparing methods, include a relevant limitation as well as an advantage.
Distinguish a pilot hole, which lets screw threads grip the receiving timber, from a clearance hole, which lets the screw pass freely through the first piece.
Contact adhesive bonds immediately on contact, but this does not mean it has reached its full cured strength.
It can see this note and what your specification asks for.
Answers are free with an account.
1 free note left this week
Get more free notesYour answer sets when this note comes back for review, or marks it complete.
Was this note helpful?
Log in to tell us whether it helped, or to report a problem.
Last updated
Lamination
Making a component by bonding layers of timber together, often around a former to produce a curved shape.
Veneering
Bonding a thin layer of attractive timber onto a base material to improve its appearance.
Former
A shaped support used to give a material its required shape during manufacture.
Mechanical fixing
A physical fastener, such as a screw or nail, that holds components together.
Adhesive
A substance used to bond surfaces together.
PVA
Polyvinyl acetate: a water-based adhesive commonly used to bond porous timber surfaces. Standard grades are mainly suitable for dry indoor use.
Contact adhesive
An adhesive applied to both surfaces and allowed to become ready for bonding before the surfaces are pressed together, producing an immediate bond.
Pilot hole
A small hole drilled into receiving timber to guide a fastener and reduce the risk of splitting.
Clearance hole
A hole through the first component that allows a screw to pass freely without its threads gripping that component.
Countersink
A tapered recess that allows a countersunk screw head to sit flush with the surface.
Delamination
The separation of layers in a laminated material.
Wastage
A manufacturing approach that removes material to obtain the required shape or size.
Addition
A manufacturing approach that builds up a product by adding material or joining components.
Put your knowledge into practice — try past paper questions for Design and Technology
Lamination
Making a component by bonding layers of timber together, often around a former to produce a curved shape.
Veneering
Bonding a thin layer of attractive timber onto a base material to improve its appearance.
Former
A shaped support used to give a material its required shape during manufacture.
Mechanical fixing
A physical fastener, such as a screw or nail, that holds components together.
Adhesive
A substance used to bond surfaces together.
PVA
Polyvinyl acetate: a water-based adhesive commonly used to bond porous timber surfaces. Standard grades are mainly suitable for dry indoor use.
Contact adhesive
An adhesive applied to both surfaces and allowed to become ready for bonding before the surfaces are pressed together, producing an immediate bond.
Pilot hole
A small hole drilled into receiving timber to guide a fastener and reduce the risk of splitting.
Clearance hole
A hole through the first component that allows a screw to pass freely without its threads gripping that component.
Countersink
A tapered recess that allows a countersunk screw head to sit flush with the surface.
Delamination
The separation of layers in a laminated material.
Wastage
A manufacturing approach that removes material to obtain the required shape or size.
Addition
A manufacturing approach that builds up a product by adding material or joining components.