Loading…


Loading…
Loading…
Loading…
AQA GCSE Design and Technology · 8552
AQA 8552 · Shaping and forming techniques Check the specification (PDF) (opens in a new tab)
Timber-based materials can be shaped by removing unwanted material. Cutting separates pieces, drilling makes holes, chiselling removes material from selected areas, and planing removes thin shavings. Sanding uses abrasion: abrasive particles rub away small particles of timber to refine a shape or smooth its surface.
These processes often work together. To make a timber joint, a maker might saw its boundaries, chisel out the waste and then smooth the finished surfaces. Choosing the right tool depends on the material's thickness, the shape required and how much material needs removing.
Accurate work begins before the tool touches the timber. Measurements are taken from a datum, a fixed reference point or edge, rather than from a succession of new points. A square can be used to mark lines at 90° to a straight edge. Mark the required cutting lines, hole positions or recess boundaries clearly.
Clamp the timber or hold it in a vice so that it cannot move during the operation. Movement makes a tool harder to control and can spoil the position or shape of a cut. As material is removed, check progress against the marked dimensions rather than relying only on appearance.
A saw removes material with the teeth along its blade. Different blades suit different cuts:
For example, the straight sides of a small timber joint suit a tenon saw, whereas a curved outline in thin timber suits a coping saw. The saw must suit both the shape and the thickness: a tool that can follow a curve is not necessarily suitable for a thick plank.
After marking out and securing the work, draw the hand saw backwards to make a small starting nick. Use the full length of the blade with controlled strokes rather than pressing too hard. Support the offcut as the cut finishes to help obtain a clean edge. Any remaining roughness can then be removed.
Powered equipment can make cutting quicker. A table saw or circular saw suits straight cuts in thick timber. A scroll saw suits curved cuts in thin timber, while a handheld jigsaw can make curved cuts in somewhat thicker timber. A bandsaw uses a continuous blade and can carry out a range of cutting tasks.
A drill rotates a cutting bit to remove timber and create a hole. A handheld electric drill or a pillar drill can be used. The bit is secured in the drill's chuck, which grips it during rotation.
Choose the bit for both the hole's diameter and its shape. For a 6 mm diameter hole, choose a 6 mm drill bit. Mark the position and clamp the timber, with scrap timber underneath when drilling through it so that the bit can pass through without entering the workbench. Lower the bit into the marked position. For a hole that does not pass all the way through, a depth stop can limit how far the bit travels.
The main bit types produce different outcomes:
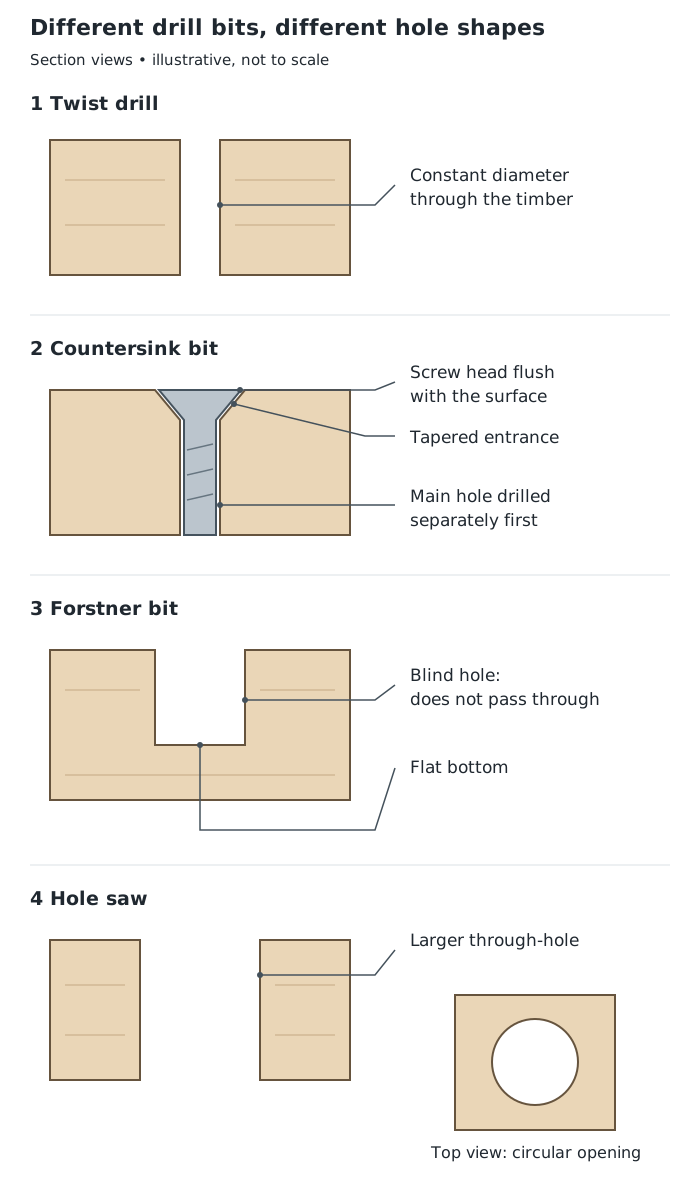
Choose a drill bit for the required hole shape as well as its diameter.
A screw fixing may therefore need two operations: drilling the hole and then countersinking its entrance. The countersink does not replace the main hole; it changes the shape at the surface.
A chisel has a sharp cutting edge that removes timber from a selected area. It is useful for recesses and joints, where a saw alone cannot remove all the waste.
Secure the timber, then mark both the area to be removed and its required depth. A mallet can be used to tap the chisel through the timber. Work progressively towards the marked shape and depth, taking account of the grain direction to obtain a controlled, clean cut.
For a square-edged recess, a tenon saw can first cut down the sides. The chisel then removes the timber between these cuts. The saw cuts define the boundaries, while the chisel clears the middle. This combination is useful when forming timber joints, including dovetails.
A plane has a sharp blade projecting slightly below its flat base. As the plane moves over timber, the blade removes thin shavings. It is used to smooth and shape an edge, rather than rubbing away fine particles as sanding does.
Work in the direction of the grain, checking the edge as material is removed. Planing can also create a chamfer by holding the tool at an angle to remove a corner. For example, planing the sharp corner of a timber strip produces a sloping face between its two original surfaces.
Sandpaper carries abrasive particles that remove small amounts of timber. It is normally used near the end of shaping to smooth rough surfaces and edges or refine a profile.
The grit number indicates how fine the abrasive is. Lower numbers are coarser and remove material more aggressively; higher numbers are finer and produce a smoother finish. A maker can begin with a coarser paper where necessary, then use finer paper to improve the surface.
For hand sanding, the paper can be wrapped around a block and rubbed against the surface. Powered sanders speed up abrasion, but their shape affects where they are useful. A disc sander suits smaller edges, a belt sander suits longer straight edges or larger flat surfaces, and a bobbin sander uses a rotating sanding cylinder to smooth internal curves. An orbital sander can smooth surfaces using a moving abrasive pad.
Sanding still removes material, so check the shape and dimensions as well as the smoothness. A smooth surface is not useful if too much timber has been removed.
Get unlimited access to all revision notes, key terms, and exam tips.
Get unlimited access to all revision notes, key terms, and exam tips.
Link each tool to the required outcome: a tenon saw for accurate straight cuts, a coping saw for curves in thin timber.
When explaining a process, include how the timber is secured, how the tool removes material and how the required size or shape is checked.
Remember that a higher sandpaper grit number means finer abrasive particles and a smoother finish.
Distinguish drilling a hole from countersinking it: countersinking shapes the entrance so a suitable screw head can sit flush.
Datum
A fixed reference point or edge from which measurements are taken when marking out a material.
Grain
The direction in which the fibres run through a piece of wood.
Wasting
A process that removes unwanted material from a workpiece to produce the required size or shape.
Abrasion
Removing small particles of material by rubbing it with an abrasive, such as sandpaper.
Grit
The number describing the fineness of an abrasive paper: lower numbers are coarser and higher numbers are finer.
Countersink
A tapered recess at the entrance to a hole that allows a suitable screw head to sit flush with the surface.
Chamfer
A sloping face made by removing the corner between two surfaces.
Put your knowledge into practice — try past paper questions for Design and Technology
Datum
A fixed reference point or edge from which measurements are taken when marking out a material.
Grain
The direction in which the fibres run through a piece of wood.
Wasting
A process that removes unwanted material from a workpiece to produce the required size or shape.
Abrasion
Removing small particles of material by rubbing it with an abrasive, such as sandpaper.
Grit
The number describing the fineness of an abrasive paper: lower numbers are coarser and higher numbers are finer.
Countersink
A tapered recess at the entrance to a hole that allows a suitable screw head to sit flush with the surface.
Chamfer
A sloping face made by removing the corner between two surfaces.