

Loading…
Loading…
Loading…
OCR GCSE Combined Science B · J260
OCR J260 · B1 Microscopy Techniques Check the specification (PDF) (opens in a new tab)
A biological specimen is a sample being examined. Some specimens, such as a whole leaf, can be observed directly or with a hand lens. Cells are much smaller, so a light microscope is needed to examine their structure.
A light microscope directs light through a thin specimen supported on a glass slide. The objective lens, close to the specimen, produces an enlarged image. The eyepiece lens enlarges this image further. The stage supports the slide, while coarse and fine focus controls adjust the distance between the specimen and the objective lens to make the image sharp.
The specimen must be thin enough for light to pass through it. Thick or overlapping layers can hide the structures you want to observe. Many cells are nearly transparent, so a stain can increase contrast: iodine is commonly used for onion cells, and methylene blue for cheek cells.
For a straightforward plant-cell observation, use onion tissue, forceps, a glass slide, a coverslip, a dropping pipette, water, iodine solution and paper towel.
Handle slides and coverslips carefully because glass can break and cause cuts. Wear eye protection when using stain, avoid skin contact and wash off splashes promptly. Use forceps carefully; any cutting with a scalpel should be carried out under the teacher’s supervision.
The slide is ready to view when the tissue is flat beneath the coverslip, covered by liquid and not obscured by large air bubbles.
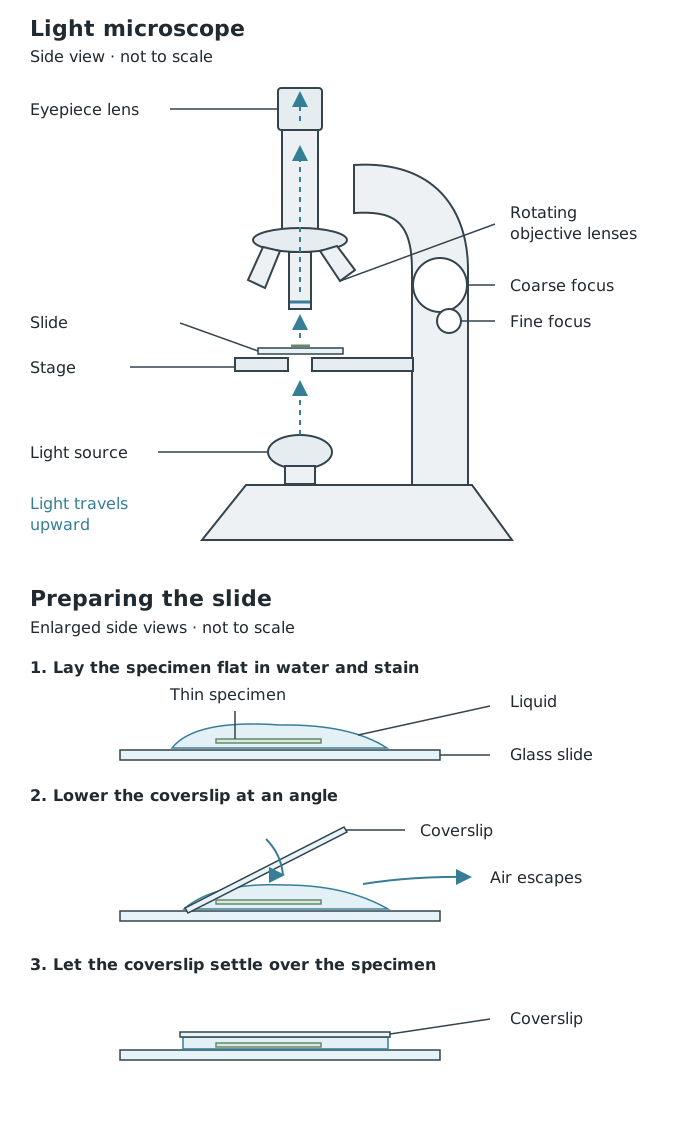
The microscope enlarges an image of a thin specimen. Careful slide preparation helps light pass through the sample without folds or trapped air bubbles obscuring it.
Start with the lowest-power objective lens. It gives a wider field of view, making the specimen easier to find, and leaves more space between the lens and the slide.
Secure the slide on the stage and position the specimen over the light opening. With the illumination on, look from the side as you bring the stage close to the objective, making sure the lens cannot touch the coverslip. Then look through the eyepiece and use coarse focus to move the stage away from the lens until the image is roughly sharp. Use fine focus to obtain a clear image.
Find a suitable region and centre it before switching to a higher-power objective. Higher magnification shows a smaller area in greater detail, so a specimen near the edge may disappear from view. At high power, use fine focus rather than large coarse-focus movements, which could drive the lens into the slide.
A successful observation has clearly distinguishable outlines rather than a blurred patch. If the image is unclear, return to low power, refocus and check that the specimen is thin, flat and properly illuminated.
The total microscope magnification combines the powers of both lenses:
For example, a eyepiece with a objective gives magnification. Changing to a objective gives . The higher setting is useful for examining cell detail once you have located the specimen.
Record the microscope magnification used for your observation. However, this does not tell someone the scale of your drawing: you could draw the same observed cell at several different sizes on paper.
The magnification of an image or drawing is calculated separately:
Measure between corresponding points on the image and specimen, using the same units. For example, suppose a cell is long and its drawing is long. Since , the drawing magnification is , written .
A scale bar gives another way to show size. It is a ruled line labelled with the actual distance represented. Only add one when that distance is known; it cannot be determined from the drawing’s appearance alone.
A scientific drawing communicates the specimen’s structure, not its artistic appearance. Study the specimen before drawing, noticing the shapes, relative sizes and positions of its parts. Choose a few representative adjacent cells when recording cell detail, unless the task asks for something different.
Use a sharp pencil on plain paper. Make the drawing large enough for its features to be clear, using single, continuous outlines. Keep structures in proportion, erase mistakes completely and leave out shading, colouring and sketchy repeated strokes. Draw a visible nucleus as an outline rather than shading it in.
Add a descriptive title and label the relevant structures you can identify. Use a ruler for straight label lines that touch the exact structures, do not cross and have no arrowheads. Write the labels horizontally outside the drawing. Include the microscope magnification used and, when known, the drawing’s scale.
For an onion specimen, label cell walls and nuclei where they are visible. Do not add structures simply because you know plant cells can contain them. The finished drawing should allow another person to understand what you observed: its main features, their arrangement and the size information you have recorded.
Large, accurate pencil outlines; correct proportions; no shading. Add a title, relevant labels with ruled lines, and magnification or known scale information. Record observed structures rather than an idealised textbook cell.
Explain why a specimen must be thin: light needs to pass through it, and overlapping layers can obscure structures.
At high power, use fine focus and keep the objective lens clear of the coverslip.
Draw the structures you actually observe, not every structure you remember from a textbook cell diagram.
Use ruled label lines that touch the correct structure, do not cross and have no arrowheads.
Convert image size and actual size to the same units before calculating magnification. Magnification has no unit.
The microscope’s magnification is not automatically the magnification of your drawing.
It can see this note and what your specification asks for.
Answers are free with an account.
1 free note left this week
Get more free notesYour answer sets when this note comes back for review, or marks it complete.
Was this note helpful?
Log in to tell us whether it helped, or to report a problem.
Last updated
Light microscope
A microscope that uses visible light and lenses to produce an enlarged image of a specimen.
Specimen
A sample of biological material being examined, such as a thin layer of onion tissue.
Objective lens
The lens closest to the specimen, which provides the first stage of magnification.
Eyepiece lens
The lens through which the observer looks, which further magnifies the image produced by the objective lens.
Magnification
How many times larger an image is than the actual object: .
Field of view
The area of the specimen visible through a microscope at one time.
Stain
A dye or solution that increases contrast, making particular structures in a specimen easier to distinguish.
Scale bar
A line on an image or drawing labelled with the actual distance it represents.
Put your knowledge into practice — try past paper questions for Combined Science B
Light microscope
A microscope that uses visible light and lenses to produce an enlarged image of a specimen.
Specimen
A sample of biological material being examined, such as a thin layer of onion tissue.
Objective lens
The lens closest to the specimen, which provides the first stage of magnification.
Eyepiece lens
The lens through which the observer looks, which further magnifies the image produced by the objective lens.
Magnification
How many times larger an image is than the actual object: .
Field of view
The area of the specimen visible through a microscope at one time.
Stain
A dye or solution that increases contrast, making particular structures in a specimen easier to distinguish.
Scale bar
A line on an image or drawing labelled with the actual distance it represents.