Loading…


Loading…
Loading…
Loading…
Edexcel GCSE Combined Science · 1SC0
Edexcel 1SC0 · Cells and Microscopy Check the specification (PDF) (opens in a new tab)
Most cells are too small to examine with the naked eye. A light microscope uses visible light and lenses to form a magnified image, allowing us to investigate cells and some of their internal structures.
Two properties determine how useful that image is. Magnification tells us how many times larger the image is than the specimen. Resolution is the ability to distinguish two close points as separate. Enlarging a blurred image makes the blur bigger; improving resolution reveals detail that was previously indistinguishable.
Light microscopes developed during the seventeenth century. In 1665, Robert Hooke examined cork and described its small compartments as cells. Improvements in lenses and microscope design subsequently increased both magnification and resolution. Modern light microscopes can show whole cells and larger sub-cellular structures, such as nuclei and vacuoles. Stains often help these structures stand out.
Electron microscopes were first developed in the 1930s. They use beams of electrons rather than visible light. The much shorter wavelength associated with the electrons allows much higher resolution, alongside higher magnification.
This means that electron microscopy reveals finer structural detail, not simply larger images. Biologists can examine small structures such as ribosomes and see more detail within mitochondria and chloroplasts. They can also investigate the structure of the nucleus and cell membrane more clearly.
Being able to distinguish these structures has increased our understanding of how cells work. Instead of treating the cell interior as an indistinct mass, scientists can identify separate sub-cellular structures and investigate their different roles. Light microscopes remain useful for school investigations, but they cannot resolve all the structures revealed by electron microscopy.
A measurement needs both a number and a unit. A cell described as 20 µm long is not the same size as one described as 20 mm long. Small units let us express cell measurements without long strings of decimal places.
| Prefix | Length unit | Equivalent in metres |
|---|---|---|
| milli | millimetre, mm | m |
| micro | micrometre, µm | m |
| nano | nanometre, nm | m |
| pico | picometre, pm | m |
Each step down this table gives a unit that is 1,000 times smaller. Therefore:
When converting to a smaller unit, multiply: more of the smaller units are needed to describe the same length. When converting to a larger unit, divide. For instance, 250 µm is mm. The object has not changed size; only the unit has changed.
Always convert measurements to a common unit before comparing their sizes or calculating a ratio.
An estimate is useful when an exact count or measurement is impractical, and when checking whether a calculated answer is plausible. Biological specimens vary, so an estimated cell size should not be presented as an exact value for every cell.
For example, suppose about ten similar cells lie end-to-end across a distance of 0.5 mm. Their average length is approximately mm, or 50 µm. This assumes that the cells fill the distance without substantial gaps and are roughly similar in size. Measuring several cells would give a better indication of variation.
Estimating numbers of cells works in a similar way: count a manageable area and scale up to a larger area, provided the cells are distributed reasonably evenly. An estimate should be identified as approximate rather than given misleading precision.
To investigate cells, you need a light microscope, glass slide, coverslip, pipette, water and suitable biological material. Forceps help you handle a thin tissue sample; an appropriate stain makes structures easier to distinguish. Onion tissue is a useful plant specimen, while cheek cells are a common animal specimen.
For an onion preparation:
Methylene blue is commonly used to stain cheek cells. Handle glass and any sharp tools carefully, and avoid skin contact with stains.
The microscope's stage supports the slide. Light passes through the specimen and into the objective lens, then through the eyepiece lens. Coarse and fine focus controls bring the image into focus.
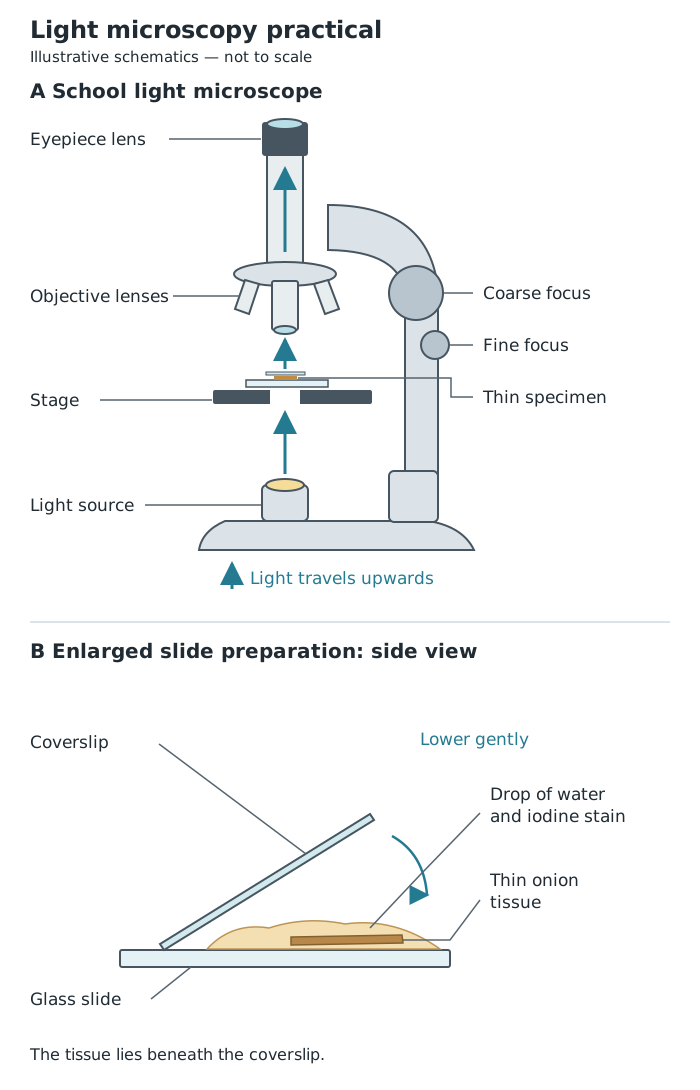
A thin specimen allows light to pass through; the lenses form the image and the focus controls sharpen it.
Start with the lowest-power objective: its wider field of view makes the specimen easier to locate. Use coarse focus to find the image, then fine focus to sharpen it. Centre the cells before changing to a higher-power objective, and use fine focus to refine the image. Keep the objective clear of the slide and coverslip.
If the image is unclear, return to low power and refocus. Check whether the tissue is too thick, whether the slide is smudged, or whether bubbles or overlapping cells obscure the view.
A light microscope has two sets of magnifying lenses. Its total magnification is:
A ×10 eyepiece with a ×40 objective gives a total magnification of ×400.
For a photograph or drawing, compare the size of the image with the actual size of the object:
Rearranging gives:
For example, an image is 30 mm long and its magnification is ×3000. The actual length is mm, which is 10 µm. Magnification has no unit because it is a ratio of two lengths measured in the same unit.
The magnification of a drawing is not automatically the microscope's lens magnification: it depends on how large you draw the specimen. Direct measurements through a microscope require a calibrated scale, such as an eyepiece graticule calibrated using a stage micrometer.
A scientific drawing communicates the structures you actually observe. Choose a clear group of cells and make a large drawing with proportions that reflect the view through the microscope.
Use sharp pencil lines, without shading or decorative colouring. Label visible structures using straight label lines that end at the structure and do not cross. Give the drawing a descriptive title and record its magnification or an appropriate scale if known.
An onion observation may show cell walls and stained nuclei, but you should not add every structure from a textbook plant-cell diagram. Microscopy records evidence: a structure may be present in a cell without being distinguishable in your preparation.
Remember that a slide gives a two-dimensional view of a three-dimensional specimen. Different cutting planes can produce different apparent shapes and sizes, and preparation may alter the specimen.
Standard form keeps very small or very large numbers manageable. It has the form , with . A negative exponent describes a number smaller than one: .
For multiplication, multiply the leading numbers and add the powers. For division, divide the leading numbers and subtract the powers. Adjust the final answer so that its leading number is between 1 and 10.
For example, using lengths already expressed in metres, an image size of m and an actual size of m give:
The image is therefore 3,000 times the actual length. For addition or subtraction, first express the quantities using the same power of ten: .
; ; ; .
Between mm → µm → nm → pm, multiply by 1,000 at each step; reverse the direction by dividing.
Use estimates for impractical counts or measurements and to check plausibility. State assumptions and recognise biological variation.
= magnification, = image size, = actual size. Use the same length units for and .
Total microscope magnification = eyepiece magnification × objective magnification.
Write , where .
Convert image size and actual size into the same unit before calculating magnification. Magnification has no unit: write it as, for example, ×400.
Do not confuse magnification with resolution. A larger image does not necessarily show more detail.
For scientific drawings, record what you observe rather than adding structures you know ought to be present.
Show unit conversions and calculation steps, and check that your answer is a sensible size.
Standard-form calculations are Higher Tier content in this specification.
Magnification
The factor by which an image is larger than the actual object: .
Resolution
The ability to distinguish two close points as separate. Higher resolution allows finer detail to be seen.
Light microscope
An instrument that uses visible light and lenses to produce a magnified image of a specimen.
Electron microscope
An instrument that uses a beam of electrons to produce images with much higher resolution than a light microscope.
Specimen
A biological sample prepared for examination, such as a thin layer of onion tissue on a microscope slide.
Stain
A dye or chemical used to make particular structures easier to distinguish in a specimen.
Estimate
An approximate value used when an exact measurement or count is impractical, or to check whether a result is reasonable.
Millimetre
A unit of length equal to metres. Its symbol is mm.
Micrometre
A unit of length equal to metres. Its symbol is µm.
Nanometre
A unit of length equal to metres. Its symbol is nm.
Picometre
A unit of length equal to metres. Its symbol is pm.
Standard form
A way of writing a number as , where and is an integer.
Put your knowledge into practice — try past paper questions for Combined Science
Magnification
The factor by which an image is larger than the actual object: .
Resolution
The ability to distinguish two close points as separate. Higher resolution allows finer detail to be seen.
Light microscope
An instrument that uses visible light and lenses to produce a magnified image of a specimen.
Electron microscope
An instrument that uses a beam of electrons to produce images with much higher resolution than a light microscope.
Specimen
A biological sample prepared for examination, such as a thin layer of onion tissue on a microscope slide.
Stain
A dye or chemical used to make particular structures easier to distinguish in a specimen.
Estimate
An approximate value used when an exact measurement or count is impractical, or to check whether a result is reasonable.
Millimetre
A unit of length equal to metres. Its symbol is mm.
Micrometre
A unit of length equal to metres. Its symbol is µm.
Nanometre
A unit of length equal to metres. Its symbol is nm.
Picometre
A unit of length equal to metres. Its symbol is pm.
Standard form
A way of writing a number as , where and is an integer.